TweakHound
Installing Windows Vista
(last updated June, 2009)
A start-to-finish, step-by-step guide to properly installing Windows Vista.
Please read through this entire guide before doing anything.
Before Purchasing Vista
You'll see articles/posts/blogs around the web talking about the minimum requirements to run Vista. Microsoft's minimum req's have always been a joke, the general rule of thumb for Geeks has been take the minimum and double it. Note the word MINIMUM, bottom line is the faster machine you have the better Vista will run.
1 - Check Your Hardware and Software
Download and run Windows Vista Upgrade Advisor on the computer you intend to install Vista on. This will give you a general idea on what hardware/software will work and the ones you may have problems with.
2 - Which Edition?
Well, here is the page that compares all the features of each version. My recommendation, use Vista Home Premium. You'll be tempted to get "Ultimate" because of the name. I've got Ultimate because I need to test all the features. Ultimate contains the features of Home Premium + Business. That means that for the folks at home it most likely has features you do not need. This leads to more unneeded things running in the background hogging your system resources.
3 - Do I need an Upgrade or Full version?
If you intend on installing Vista on a machine that already has a Windows operating system, and you intend to upgrade (install over it) then get an upgrade version. Otherwise the license requirement says you need a full version. Yes you can do a clean install using an upgrade disk (instructions below). Please note, the Vista license agreement states that if you use an upgrade version then the OS you installed Vista over is no longer valid. This may or may not be a technicality based on your own set of morals. Example, I recently got a new laptop from Dell which came with XP installed and a free upgrade to Vista when available. Since I wanted to dual-boot (run both OS's) XP and Vista I could not legally use the upgrade disk so I had to buy the full version.
(please do not write to me and whine about how expensive Vista is to justify your using an upgrade disk. Vista is not a "must have". Stick with XP or try Linux, it's free.)
Before Installing Vista
1 - Download all your drivers.
To find out all the specifics of your computer and its hardware download SIW and run it.
You can get the drivers from the website of the manufacturer of you computer and/or hardware (Google is your friend).
If you cannot find a specific Vista driver for your hardware then download the latest one for XP (it is possible it may work).
Once you've got them all, burn them to a CD and/or a USB drive.
2 - Backup any and everything you may want that is currently installed on the computer. This means to a location other than the computer that Vista is to be installed on. For a few suggestions on how look here.
3 - Optional, Wipe the target installation drive. No self-respecting Geek would ever do an upgrade install to a new OS. If you insist on doing an upgrade then skip this step. I used an Acronis Disk Director boot disk for this but there are other tools available. Please note, I do not recommend using any method other than the installation disk to repartition the drive. I've heard scattered reports of problems using other methods.
4 - Dual or Multi-booting
If you are dual-booting with XP. Be warned, Vista will modify your boot files (that was a hint to backup XP before continuing). Vista works fine dual-booting but modifying the boot manager is a PITA. Fortunately there is a excellent free tool to help you, VistaBootPRO. You can use this from within XP and/or Vista.
If you want to Multi-boot XP, Vista, and Linux. Install XP, then Vista, then Linux. Use Grub for your boot manager and there will be no issues.
5 - It is most likely going to be easier for your to use Windows Update to update to SP2 (SP1 is required to be installed before SP2). If you choose to manually update Vista tp SP1 and SP2 the links are below (provided your install disc does not have them).
SP1
Windows Vista Service Pack 1 Five Language Standalone (KB936330) 434.5 MB
Windows Vista Service Pack 1 Five Language Standalone for x64-based Systems (KB936330) 726.5 MB
SP2
Windows Vista Service Pack 2 - Five Language Standalone (KB948465)Windows Vista Service Pack 2 - Five Language Standalone for x64-based systems (KB948465)
Installing Vista
Installing Vista is almost idiot proof. I won't insult you by showing install screens. Pop in the DVD and let'er rip. The few questions you have to answer are straight forward.
If you wish to partition the drive during install make the partition 30GB if you have the space, 12GB if you don't.
(officially they list 20GB with 15GB of free space)
Clean Install ( I recommend using these steps regardless to whether or not you have a full or upgrade disk)
You cannot do a clean install from an upgrade disk. So here is the workaround (initial source here)
1 - Wipe drive/partition
2 - Install Vista. If using an upgrade disk, DO NOT ENTER YOUR KEY
3 - If using an upgrade disk. On first boot, run install again from within Vista, choose clean install. This time enter key.
4 - DO NOT ACTIVATE UNTIL YOU HAVE TO and PLEASE BACKUP along the way.
First Boot
Uninstall stuff you aren't going to use.
First go to Bleeping Computer - Windows Vista Feature Guide and print out the page (or at least the list).
Go to Start > Control Panel > Programs > Uninstall a program > Turn Windows Features on or off.
Deselect (uncheck) things you don't want. What is available depends on the edition of Vista you have. If you see something listed here that isn't in yor list don't worry. you don't have it. I choose to uninstall:
-Games (all)
-Print Services (all)
-Remote Differential Compression
-Tablet PC Optional Components
-Windows DFS Replication Service
-Windows Fax and Scan
-Windows Meeting Space
Click OK and then reboot if prompted
Install Drivers
tip #1 - To quickly access Device Manager, hit the Windows + R keys and type devmgmt.msc
tip #2 - In Device Manager, if an item has an exclamation icon
![]() then it needs a driver.
then it needs a driver.
The order I use to install drivers is:
Chipset
RAID and/or other drivers involving storage
Graphics
Sound
LAN
Install Service Pack 1
If you don't see it in Windows Update, see: Windows Vista Service Pack 1 is not available for installation from Windows Update and is not offered by Automatic Updates
I recommend you do this after installing your drivers because not having the newest drivers may block the installation of SP1.
Install Service Pack 2
Vista Service Pack Cleanup
Once you've installed both Service Packs and everything is running well, AND you are absolutely 100% sure you do not want to uninstall it, AND you have backed up your system... You can run this command compcln.exe .
This will allow you to reclaim significant disk space. To do this press the Windows + R keys and type compcln.exe in the run box, or, if you prefer using the command line: press the Windows + R keys and type cmd then type compcln.exe .
More info from Microsoft:
|
Windows Component Clean Tool (COMPCLN) The Windows Component Clean Tool (COMPCLN.exe) can be used to remove the files that are archived after Windows Vista SP2 or Windows Server 2008 SP2 is applied. It also removes the files that were archived after Windows Vista SP1 was applied, if they are found on the system. Running this tool is optional. Installing Windows Vista service packs increases the amount of disk space that is used by the operating system. This space is used to archive files so that the service pack can be uninstalled. Typically, you should run COMPCLN.exe if you want to reclaim this disk space after applying SP2 and if you will not need to uninstall SP2. You cannot uninstall Windows Vista SP2 or Windows Server 2008 SP2 after you run this tool on an image. This tool can be used online or offline. |
Please do not whine at me if you run into problems and you haven't backed up your computer!
Install
Internet Explorer 8
You should use Windows Update for this.
First Cleanup
Go to Start > Programs > Accessories > System Tools > Disk Cleanup > Files from all users on this computer
Choose the drive Vista is installed (usually C)
Check (enable) everything, hit OK.
tip #1 - If you did an upgrade and need files from the previous OS then do not check the box next to Previous Windows installation(s) as this deletes the Windows.old folder.
Setup Advanced Cleanup
Press the Windows + R keys, type cleanmgr /sageset:50
Select the options you desire, I choose them all. Click OK and close out the window.
Press the Windows + R keys, type cleanmgr /sagerun:50.
(note - there is a space between the r and the /)
* You can use this command at any time for regular disk cleanups. I use the number 50 because it is easy to remember, you can use any number you want.
*tip - this works in Safe Mode too.
Windows Update
Run it and keep running it until all Critical Updates are installed and any Optional Updates you want are installed.
Disable Automatic Activation
Vista will activate itself after 3 days if you didn't check the don't activate box during installation. To stop it from activating itself:
Open regedit (press the Windows + R keys, in the run window type regedit and hit enter). Navigate to the following key,
HKEY_LOCAL_MACHINE\SOFTWARE\Microsoft\Windows NT\CurrentVersion\SL\Activation
In the right window pane, change the setting Manual to 1.
Registry key:
[HKEY_LOCAL_MACHINE\SOFTWARE\Microsoft\Windows
NT\CurrentVersion\SL\Activation]
"Manual"=dword:00000001
Backup - Make An Image
I used an Acronis TI Boot Disk
(please note I did not say install a backup program (yet). Both Acronis True Image and Norton Ghost have the ability to make boot disks)
Install Your Programs
***Very important.
If you intend to disable User Access Control (UAC) as I have then you should do this BEFORE YOU INSTALL ANY PROGRAM. Not doing so can lead to problems later.
To Disable UAC:
-Press the Windows + R keys > type msconfig > open the Tools pane.
-Scroll down to Disable UAC and click once on that line.
-Hit the Launch button.
PAY ATTENTION to what you are installing (in other words, don't keep clicking Next). Don't install more than you need. Decide what apps you want to do what. For instance:
I use Winamp Lite (and I use a very basic install for that) as the Default for playing .wav and .mp3 files because it opens faster and with a smaller footprint than say Windows Media Player or iTunes. Also, I have no application launching when I insert a music CD or DVD either.
Major Applications
I recommend you install the major applications first (i.e.
software firewalls, Office, and the applications that come with your
hardware). Always use the custom or advanced installation method and
pay attention to the options screens. I install all the applications
to the same drive as the OS. That is because I use backup program,
and use it often! Pick and choose the parts you install carefully.
If you don't need it, don't install it. Avoid allowing anything
that isn't necessary to "load at startup."� As you install each
application, download (if you haven't already) and install all
updates and patches before you move on to the next application. I
prefer to load my backup program first and make an image before I go
further.
Minor Applications
Next install the minor applications (Sound, graphics,
utilities, etc.) Check for the most recent versions first. Before
you install them, decide which applications you want to perform
what. If you have multiple applications that can do or play the same
thing, decide which you prefer. For example; I have Windows Media
Player, Winamp, ATI File Player, and iTunes all wanting to be the
default player for many of the same files. If not configured
properly, they will fight for dominance. Giving each player it's
own default settings doesn't mean you can't ever play it in
another application. After you install each application, open them
and double check configuration settings, some applications don't
play nice!
Use cleanmgr /sagerun:50 again!
Configure Your Email
If your ISP software didn't do it, configure your email
now.
Move Your Documents
Vista really hosed things by replacing the My Documents folder.
Moving this info has two benefits:
1 - These files are safe from any OS problems and are unaffected if you need to restore the OS from backup.
2 - Cuts down on disk fragmentation.
In the Classic Start Menu, Click on your User Name icon or In the
new menu style click on your User Name.
For each of the folders you want to replace, Copy and Paste them to
the desired new location.
(ensure you do not have a folder there by that name)
Next, for each folder you copied,
Right-click on that folder and choose Properties.
Click on the Location pane and then click the Move... button.
Navigate to corresponding folder in the new loaction
Click Apply, answer Yes in the resulting pop-up (choose Copy and
Replace for any other screens).
You can do this for any folder here but I recommend moving:
Contacts
Documents
Downloads
Music
Pictures
Videos
Configure Programs That Start With Vista
Get everything you possibly can out of the System Tray (by
the clock in the lower right hand of the screen). The best way to do
this is in the applications options. If that fails, use Autoruns.
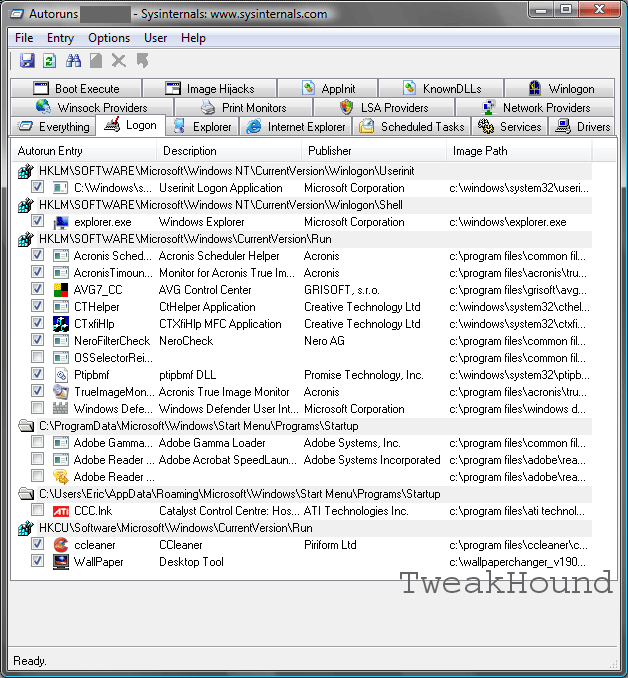
Autoruns
Extract the folder to your root drive (usually C). Open the Autoruns folder and double-click autoruns.exe. Click on the Logon tab, Uncheck anything you do not want to start with Vista. The fewer things the better. If you don't know what it is, leave it alone. Advanced users may want to go to the SERVICES tab and make modifications there.
Autoruns
CCleaner
Download and install CCleaner Slim.
Configure it - Poke around and choose your options (I enable Run CCleaner when the computer starts).
Run it.
Organize Your Start Menu
Here I like to organize my Start Menu.
I prefer the old style start menu. If you wish to switch to this, right-click on the Start button and choose Properties, check Classic Start menu, click Apply.
(click on thumbnails for a larger image)
|
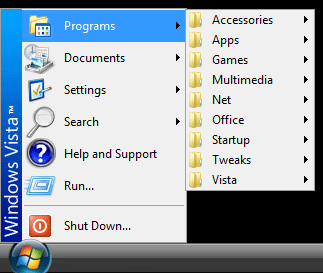
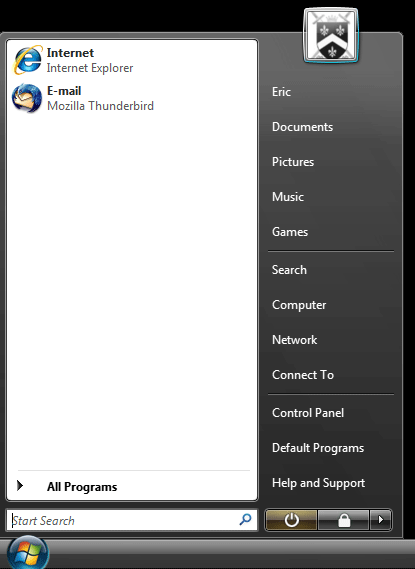
Classic Menu
|
Default Menu
|
From the default style start menu:
Add and remove features, right-click On the Start button and choose Properties, click the Customize button.
In the resulting Window (I'll give these to you in order, top to bottom):
-For Computer, Control Panel, and Documents check Display as menu.
-Check the Run box
-under System administrative tools, check Display on the All Programs menu and the Start menu.
-click OK, then Apply.
Organize - Go to START > All PROGRAMS > right click >
EXPLORE, repeat and this time right click EXPLORE ALL USERS.
Open (double-click) the Programs folder. I create my own
folders using names like: Sound, Pix, Video, Office, Apps,
etc. To do this right-click in an empty space in the window
and choose New > New Folder and name it. Then drag or cut
and paste the old folders into the ones you made. I also
like to cleanup my desktop by renaming icons to one line
names (right click > RENAME), and moving them to where I
want them on the screen. If you have created multiple users,
it is a good idea to check each one to make sure that they
have all your programs. Some programs need to be installed
on each user account. (You may want to open all your
applications now to make sure they work.) Shut down your
computer.
From the classic style start menu:
Add and remove features, right-click On the Start button and
choose Properties, click the Customize button > I recommend
the following boxes be checked, uncheck the rest:
-Display Administrative Tools
-Display Run
-Enable dragging and dropping
-Expand Control Panel
-Expand My Documents
-Expand Network Connections
-click OK, then Apply.
Organize - Go to START > PROGRAMS > right click > EXPLORE, repeat and this time right click EXPLORE ALL USERS. I create my own folders using names like: Sound, Pix, Video, Office, Apps, etc. To do this right-click in an empty space in the window and choose New > New Folder and name it. Then drag or cut and paste the old folders into the ones you made. I also like to cleanup my desktop by renaming icons to one line names (right click > RENAME), and moving them to where I want them on the screen. If you have created multiple users, it is a good idea to check each one to make sure that they have all your programs. Some programs need to be installed on each user account. (You may want to open all your applications now to make sure they work.) Shut down your computer.
Final Cleanup & Defrag
Start up in Safe Mode and use cleanmgr /sagerun:50 again!
Run CCleaner.
Next, go to START > PROGRAMS > ACCESSORIES > SYSTEM TOOLS >
DISK DEFRAGMENTER. Highlight the drive you installed Vista
on, click the DEFRAGMENT button. This will take a while.
When finished shut down and restart.
(I prefer to use a 3rd party defrag tool called PerfectDisk.)
Backup
Whatever backup method you prefer, make a backup.
You're done!
Tweaking comes next, beta version is here.
Extra Tip
Extend Trial Period Up To 120 Days
This allows you to keep running Vista without a key. Personally I don't know why you would do this if you are running legit software. You'll know whether or not you're gonna keep running Vista before 30 days is up. But, here it is:
The easy way (30 days at a time):
Neowin - Official Way to Use Vista without Activation 120 Days
More complicated way (create a task to autorun the above every 30 days):
ZDNet - Use Vista for four months, free
Tweaking Windows 7
Installing Windows 7
TweakHound's Super XP Tweaking Guide - SP3 Final
Tweaking Windows Vista
The Right Way To Install Windows XP
Installing Windows Vista
The
Freeware XP Machine
The Vista
Freeware Machine
Windows XP
Backup Strategies For Home Users
Windows Vista Backup Strategies For Home Users
Installing
Suse Linux 10.3
How To Samba With openSUSE 11.2 and Windows

I use True Image 2011 for all my OS backups and Disk Director 11.0 for all my partitioning requirements.
TweakHound readers often get a discount off Acronis Products. Check the links for more info.