How I Install Windows XP
By Eric Vaughan
September, 2005
This is a more advanced, albeit quick version of The Right Way To Install XP. It assumes more familiarity with installing XP than the average user.
I'll walk you step-by-step through the way I install Windows XP with the applications I use. Please read through the entire guide before doing anything.
Programs in this guide:
|
The Free Programs* |
The Pay-for Programs* |
| * Programs in RED indicates this program is required to completely follow this guide. * Programs in BLUE are optional but highly recommended. You should download and save all these before you begin! |
|
Preparation
1 - I make sure I've backed up all my data. Since all of that stuff is not on the same partition as XP anyway it is an easy task.
2 - I make a final image of my drive as it is using Acronis True Image just in case something goes wrong.
3 - For installs involving a Windows XP disk that does not have Service Pack 2, I make a slipstreamed disk using Paul Thurrott's Slipstreaming Windows XP with Service Pack 3. I then use nlite to customize my install.
4 - I download updates to every piece of hardware and program I have. I put these in a folder called new_install on a partition other than the one XP is installed on. I also burn the drivers to a CD. If a file I've download can be extracted using 7-Zip I do so.
Installation
On my own machine I install XP on a drive by itself with a single partition.
On other machines I make a partition 15-20 gigabytes in size.
These are formatted NTFS of course.
Initial Boot(s)
*Note to wi-fi users. I recommend you use a wired connection for everything until XP is completely setup. Disable the wi-fi connection on first boot or as soon as you get the drivers installed. To disable the connection Open your Network Connection Properties, go to Start > Run > type control ncpa.cpl exactly as you see here > right-click on the wi-fi connection and choose disable.
1 - Switch to Classic Start Menu
Right click on START > click properties > click the classic start menu button, now click CUSTOMIZE > place a check in the EXPAND CONTROL PANEL option. All CONTROL PANEL options can now be accessed from START > SETTINGS > CONTROL PANEL > (option) If you are like me and want to see all of the programs in the start menu (instead of a few items and some arrows at the bottom), uncheck the USE PERSONALIZED MENUS option. Click OK to close that box and APPLY.
2 - Disable Automatic Updates, Security Center
Press the Windows & Pause Break keys > Click on the Automatic Updates tab > uncheck the box next to “Turn off Automatic Updates…”
Press the Windows and R keys > in the resulting window type services.msc > in the resulting window scroll down to Security Center and double-click on it > In the "Startup type:" box use the arrow to scroll down to choose "Disabled" click Apply.
3 - Install chipset drivers (or config utility). Since all my personal machines are Intel based I use the Intel Chipset Software Installation Utility. Reboot now
4 - Install Video Drivers. I do a full feature install. Reboot.
5 - Uninstall Windows Messenger, MSN Explorer, Games, and Outlook Express.
Control Panel > Add or Remove Programs > Add/Remove Windows Components.
6 - Run Windows Update and go through all the mess Microsoft puts you through. I use the Custom Install option. Install the High Priority Updates, under the Software, Optional section choose >.NET Framework, and Windows Media Player 10. Reboot and sign on again and install any remaining High Priority updates.
7 - Install all remaining hardware.
8 - Install Acronis True Image, make an image and rescue disks. (see here for more info)
Format Other Drives
1 - Install Acronis Disk Director.
2 -On the non-XP partition, create partitions for: 1 - Page file (if you have more than 1 drive), 2 - My Documents and Print Spool folder (if printer is attached to that machine), 3 - Data.
-Create page file partition and make 2nd page file. Reboot. See The Page File for more info.
-Create a partition for My Documents and move the My Documents folder to it.
Right click on the My Documents folder > choose Properties > Click on the Move... button > Expand My Computer and choose the drive you want to move it to > click the Make New Folder button and name it anything you like > click Apply > a screen will pop-up, click yes.
Move Print Spool folder to that partition.
Create a new folder on that partition called PrintSpool > now go to START > Printers and Faxes > click on File at the top left of the window > scroll down and click Server Properties > click on the Advanced tab > type the COMPLETE path to the PrintSpool folder you just created (i.e. - D:\\PrintSpool).
- Create another partition for data.
Install Applications
Open, update, and configure each one before moving one to the next. I also do the install in "groupings". Picture/photo, sound, utility, etc...
PAY ATTENTION to what you are installing (in other words, don't keep clicking Next). Don't install more than you need. Decide what apps you want to do what. For instance:
I use Winamp Lite (and I use a very basic install for that) as the Default for playing .wav and .mp3 files because it opens faster and with a smaller footprint than say Windows Media Player or iTunes. Also, I have no application launching when I insert a music CD or DVD either.
1 - Microsoft Office
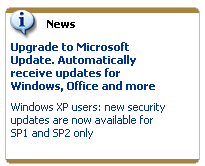
Copy the contents of the Office CD to a permanent non-OS partition (usually My Docs) and install from there. This allows you to delete all installation files (option at end of install and disk cleanup) of your XP drive and maintain full Office functionality w/o the CD. Install any Service Packs. Sign on to Windows Update and install Microsoft Update, this integrates Windows Update & Office Update. To install Microsoft Update, sign on to Windows Update > in the bottom right of the screen you should see the section in the picture below > click it and follow the instructions.

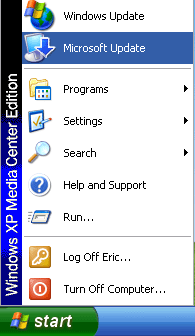
When everything is finished close out the windows. Open your start menu and you should now see this:

Sign on To Microsoft Update and choose appropriate updates.
2 - Firefox
Install and configure Firefox. Import saved bookmarks for both IE and Firefox from saved files. Install any addons now.
3 - Flash, Java
Install J2SE Runtime Environment , Shockwave Flash.
4 - Install CD Burning Apps
5 - Other Major Apps
I usually do the larger programs first Photoshop, etc... I also to the install in "groupings". Picture/photo, sound, utility.
6 - If you use a third party firewal, install it now.
7 - Anti-Virus
Install and configure your Anti-Virus and Windows Defender. These are the only apps I allow to Auto Update.
8 - Thunderbird
Install and configure Thunderbird.
Move the profile folder to the My Documents folder which is on a different partition. This has the benefit of keeping all email and settings as is (i.e.-you won't lose them) when you restore XP from backup.
See Mozillazine's, Moving your profile folder for a how-to.
9 - Instant Messaging
Install and configure you IM program(s).
10 - Anti-Spyware
Install, update, and configure any other anti-spyware you may be using.
11- Tweaking Apps and Utilities
Install and configure PerfectDisk, CCleaner, TweakUI.
12 - Install any remaining applications.
13 - VERY IMPORTANT, make an image now!!!
Organize The Start Menu
Here I like to organize my Start Menu. Go to START > PROGRAMS > right click > EXPLORE, repeat and this time right click EXPLORE ALL USERS. I create my own folders using names like: Sound, Pix, Video, Office, Apps, etc. Then drag or cut and paste the old folders into the ones I made. I also like to cleanup my desktop by renaming icons to one line names (right click > RENAME), and moving them to where I want them on the screen.
Tweak It!
Tweak your settings as you see fit. See:
Clean it!
Run CCleaner.
Reboot into Safe Mode.
Press the Windows & R keys > type cleanmgr /sageset:50 . Ensure there is a space between cleanmgr and / > click OK. In the resulting screen, choose your options by checking the boxes. I choose all but the bottom two. Click OK. Press the Windows & R keys > type cleanmgr /sagerun:50.
Run CCleaner. Reboot.
Defrag
If you use the built-in defragmenter, reboot into safe mode and run it.
If you are using PerfectDisk:
Open PerfectDisk. In the top menu choose Schedule > New Local Schedule > name the schedule > choose Select the drives you would like to defragment in this schedule > choose the drive XP is installed any any partitions that have a page file, click Next > check everything except Defragment only (as in everything should be filled in but that). Click Next > choose your poison, I do Once, click Next > click Finish. This will take a while. PerfectDisk is a highly advanced program and it needs to learn your individual system. It gets faster each time you run it.
Reboot and make and image. You're done!
Tweaking Windows 7
Installing Windows 7
TweakHound's Super XP Tweaking Guide - SP3 Final
Tweaking Windows Vista
The Right Way To Install Windows XP
Installing Windows Vista
The
Freeware XP Machine
The Vista
Freeware Machine
Windows XP
Backup Strategies For Home Users
Windows Vista Backup Strategies For Home Users
Installing
Suse Linux 10.3
How To Samba With openSUSE 11.2 and Windows
I use True Image 2011 for all my OS backups and Disk Director 11.0 for all my partitioning requirements.
TweakHound readers often get a discount off Acronis Products. Check the links for more info.