How To Network openSUSE 11.4 And Windows
This article will show you how to network openSUSE 11.4 with Windows
XP, Windows Vista, and Windows 7.
It is assumed that you are using the openSUSE default desktop, KDE4
(you'll need Samba client/server installed).
Any Windows 7 machines should NOT be using the HomeGroup option but
instead use the advanced sharing option.
How to share Windows files is not covered. If you can't do that, well,
Linux may be out of your league ;)
This article applies to workgroups only, not domains.
To make it easier on you this is a one page article, heavy on the screenshots.
It is specifically created for the average user and thus relies on the GUI configuration options when possible.
It is my hope you find this article useful.
Initial Setup
From your Suse box, open YaST (type in Root password).
Next go to Network Services > Network Services (xinetd)
Find the swat service, highlight, and click the Toggle Status (On or Off) button to toggle on. Then click Finish.
Now back in the YaST Control Center click on System then System Services (Runlevel)
Highlight and then click Enable (or ensure that they are enabled)
button for the following services:
nmb
smb
xinetd
Then click OK.
Now back in the YaST Control Center click on Network Services then Samba Server.
Under the Start Up tab ensure that Service Start > During Boot is checked. If you are using the Suse firewall also check Open Port in Firewall.
Click on the Shares tab. Check the box next to Allow Users to Share Their Directories.
The box next to Allow Guest Access is optional. It can be considered
a security risk but can make things easier.
Next click on the Identity tab. Fill in your Workgroup or Domain Name (the exact same name as your Windows workgroup).
Next make sure the box under Domain Controller says NOT a DC.
Then, in the box NetBIOS Host Name enter the name you want for your computer. Click OK when done.
SWAT
Open Konqueror (or Firefox). In the address bar type localhost:901 and
press the Enter key.
In the resulting screen enter your root name and password and click OK.
Click on the Globals icon. Fill in the sections marked by the red paw
(if they are not already filled in). Most users will not need to mess
with anything else.
Click the Commit Changes button when finished.
Firewall
Now we have to make sure we can Samba to and from your Suse box
through the firewall.
Open YaST. Click on Security and Users > Firewall.
In the Start-Up section ensure the Start Firewall When Booting option is checked.
Click on the Allowed Services tab.
Under Service to Allow choose Samba Server (if it sin't already there) then click Add. Repeat this step and add Samba Client, and Netbios Server.
When finished click Next and then Accept. When finished go back to the Start-Up section and click Save Settings and Restart Firewall Now.
Adding A User
Browsing and accessing files in both directions requires a user with
Samba permissions.
This user needs to already exist. You can use your account if desired
(if not then it's best to add them through YaST).
To add a Samba user:
Open a terminal and su to root.
type the following smbpasswd -a
username and hit enter
type and then confirm password.
Sharing Files
Open Konqueror or Dolphin. Pick a folder you wish to share,
right-click on it and choose Properties.
If you haven't shared files before the you'll need to configure this.
To do this click on the Share tab and the Configure File Sharing...
Check the following boxes:
Enable Local Network File Sharing
Advanced sharing > and Use Samba (but do not check NFS).
Then click Allowed Users. In that screen choose Allow all users to
share folders.
You can the choose more folders to share by clicking the Add... button.
When finished click Apply to save your changes.
You should now be able to share any folder by right-clicking on it
(provided you have permissions on that folder).
Make sure to check the appropriate boxes for your desired access
settings.
Most users will not need to go beyond this but for advanced
permissions/options click More Samba Options.
Letting The Network Do Its Thing
Now we are going to shut down every machine on the network. If you have
a home server, a machine with a shared printer, or a machine that is
usually on more than most then boot that one up first.
Let it get fully booted up then one-by-one start the other machines on the network, letting them fully boot up before booting the next one.
This method allows the network to sort of 'reset" itself.
Once complete you should be able to browse to all network shares
through Konqueror or Dolphin.
Look for the Network icons. You'll be going to Network > Samba shares (or SMB shares) > your workgroup.
You can also type in the name of the workgroup or machine in the
address bar:
smb://windowsworkgroupname
or
smb://machinename
Printers
I have found that it is easiest for most folks to share printers from a
Windows box to a Linux box than the other way around (there are several
reasons for this beyond the scope of this guide).
This is the method I'm going to show you.
Open YaST > go to the Hardware section and click on Printer.
Click on Print via Network then,
(Optional step - cclick the box next to Accept Printer Announcements
from CUPS Servers > accept from all hosts in the local network.)
Then double-click the Connection Wizard.
Choose Print Via Print Server Machine > Microsoft Windows/SAMBA
(SMB/CIFS).
You'll will need ALL the information for the boxes below.
Once you have filled in all the info click OK and in the resulting
screen you will have a chance to pick the appropriate driver for your
machine.
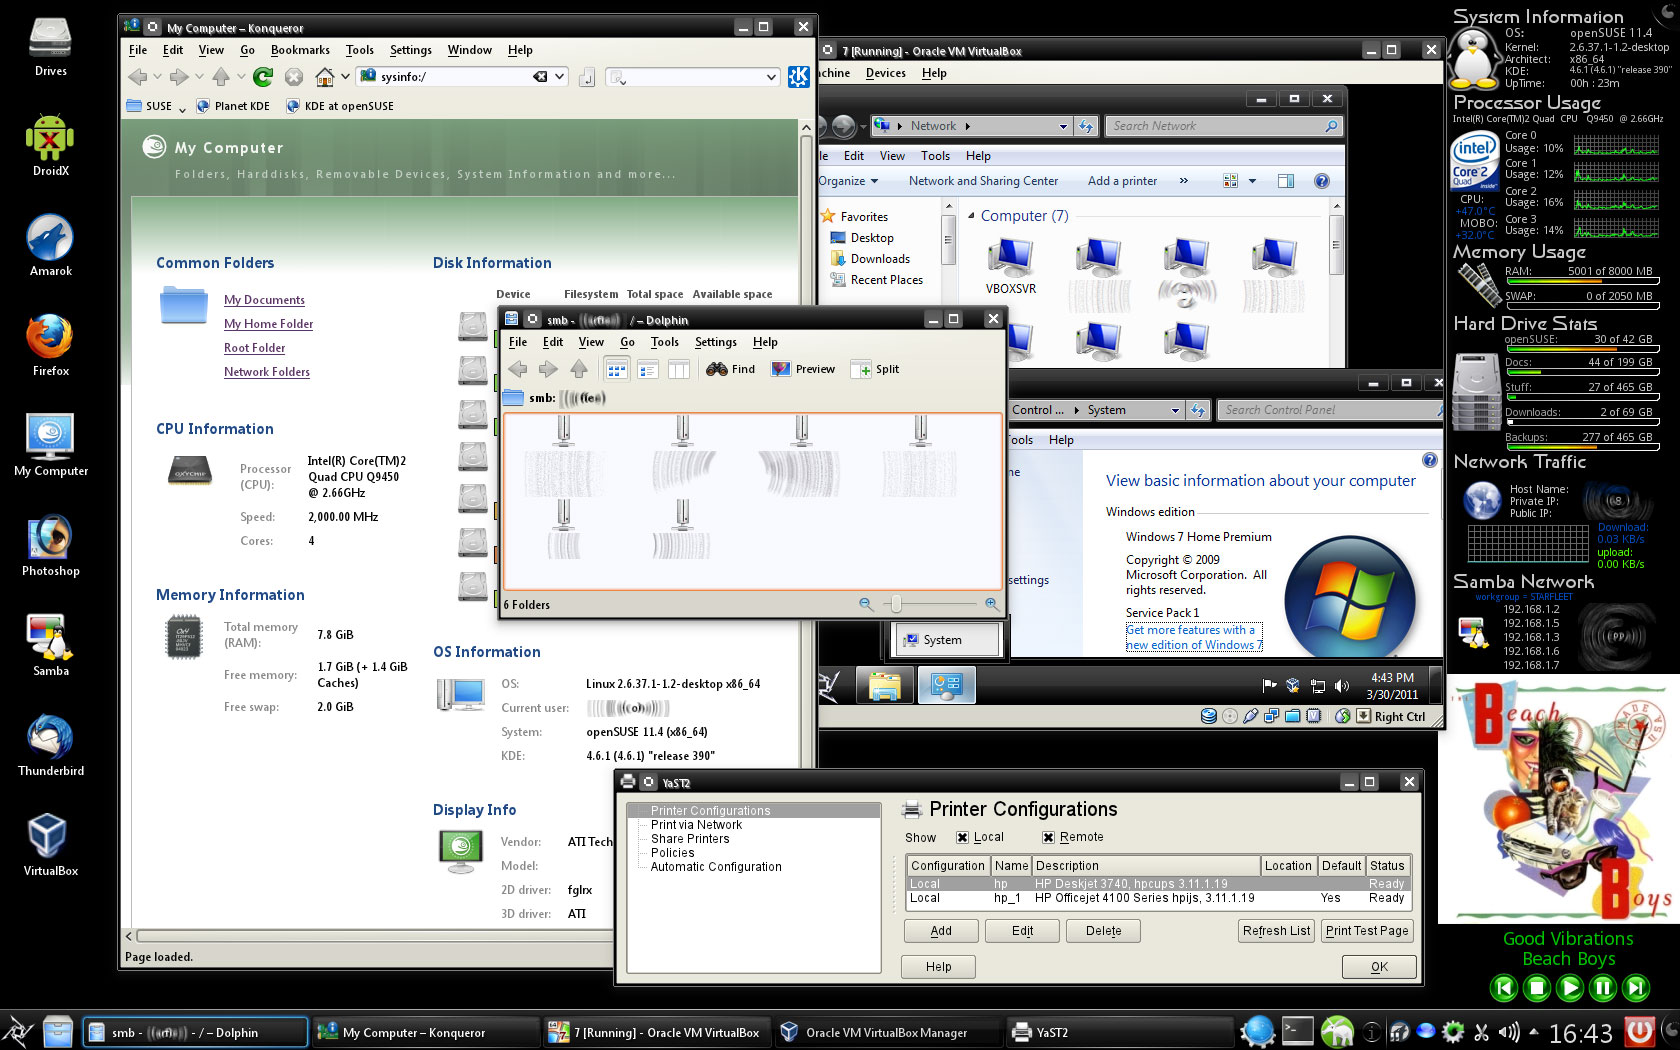
Printers shared from openSUSE 11.4 and Windows 7 to openSUSE 11.4:

How It All Looks On My Machine (click thumbnail for fill size pic)
---END---
Tweaking Windows 7
Installing Windows 7
TweakHound's Super XP Tweaking Guide - SP3 Final
Tweaking Windows Vista
The Right Way To Install Windows XP
Installing Windows Vista
The
Freeware XP Machine
The Vista
Freeware Machine
Windows XP
Backup Strategies For Home Users
Windows Vista Backup Strategies For Home Users
Installing
Suse Linux 10.3
How To Samba With Suse 11.2 And Windows
iTunes,
iPod File Types & Quality

I use True Image 2011 for all my OS backups and Disk Director 11.0 for all my partitioning requirements.
TweakHound readers often get a discount off Acronis Products. Click the links for more info.