TweakHound - Tweaking Windows Vista, page 10
Clean, Defrag, & Optimize
First download and install CCleaner Slim.
Configure it - Poke around and choose your options (I enable: Run CCleaner when the computer starts).
Run it.
Next, download Autoruns.
Extract the folder to your root drive (usually C). We will work with this in a minute.
Step 1:
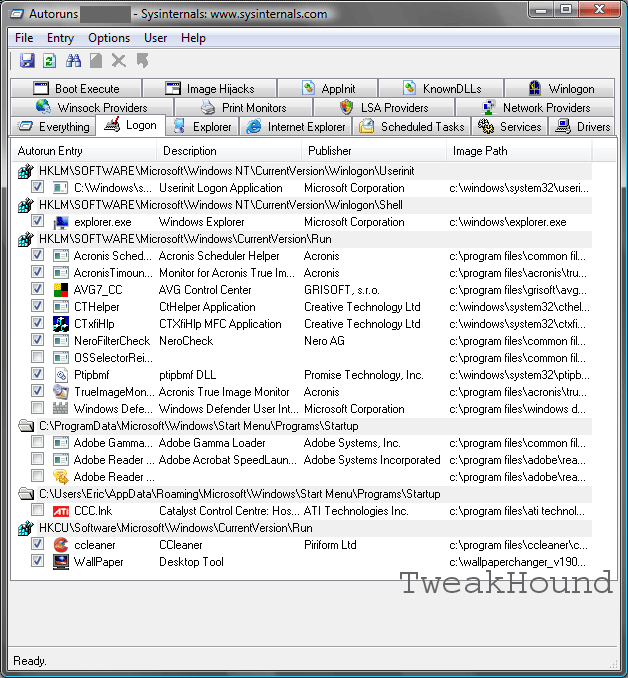
Get everything you possibly can out of the Notification Area (by the time in the lower right hand of the screen) The best way to do this is in the applications options. If that fails, use Autoruns. Navigate to and open the Autoruns folder, double-click autoruns.exe. Click on the Logon tab, Uncheck anything you do not want to start with Vista. The fewer things the better. If you don’t know what it is, leave it alone. Advanced users may want to go to the SERVICES tab and make modifications there.
Autoruns
Step 2:
Open Internet Explorer > Go to Tools > Delete Browsing History > Pick the stuff you want to clean. I use Delete all... and in the resulting window I check the box Also delete files and settings stored by addons, but be careful as this deletes your passwords too > when finished, close Internet Explorer.
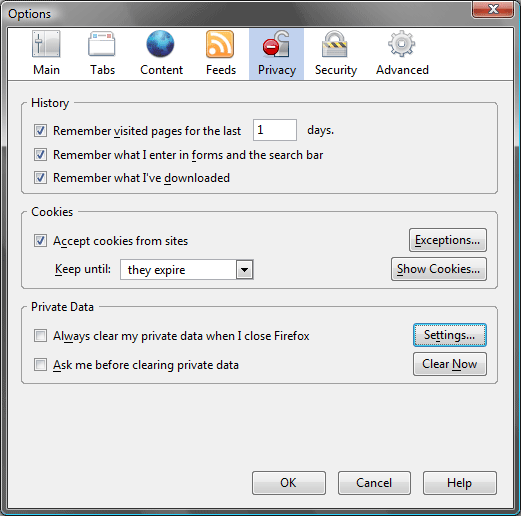
If you use Firefox (and you should). Open Firefox > in the top menu go to Tools > Options > click on Privacy and then the Settings... button > check what you would like to clean then click OK, uncheck the box next to Ask me before clearing private data (like you need something else in Vista nagging you) and click OK. We have just set the options for the following...
Open Firefox > in the top menu go to Tools > Clear Private Data (you can now use this as often as you like). Close Firefox.
Firefox, Clear Private Data Screens. Click thumbnails for a larger Image.
|
|
|
Step 3: (optional and advanced)
*see note below
Go to C:\WINDOWS\Prefetch (substitute the drive letter your OS is on). On the menu bar click on View and select Sort By > Type.
Select all the PF files and delete them.
*Note -DO NOT mess with any other prefetch settings. Only use this step for an initial install or after completing this guide. Prefetching is a good thing. I recommend doing this only under the above circumstances because we've now disabled/removed several things that were previously prefetched. Again, this is not a necessary step but I find it useful in making an optimized image (see Step 8). It should not be used except in this circumstance.
Step 4:
Start up in Safe Mode (press F8 while booting and choose Safe Mode)
-If you downloaded CCleaner, run it.
-Remove Old Restore Points
If you keep System Restore active: To remove old system restore
points go to Start >
Programs > Accessories
> System Tools >
Disk Cleanup > select the drive XP is installed on and click
OK > click the More Options
tab > in the System Restore
section, click the
Clean up… button and
Yes in the resulting screen.
-Advanced Disk Cleanup
Press the Windows + R keys, type cleanmgr /sageset:50
Select the options you desire, I choose them all. Click OK and close out the window.
Press the Windows + R keys, type cleanmgr /sagerun:50.
(note - there is a space between the r and the /)
* You can use this command at any time for regular disk cleanups. I use the number 50 because it is easy to remember, you can use any number you want.
*Tip
To make Disk Cleanup faster.
Disable "Compress Old Files"
Copy the text below into notepad and save as " fastdiskclean.reg ".
Double-click it to enable it (answer Yes to any pop-up screens).
|
Windows Registry Editor Version 5.00
|
Step 5:
Defragment your drive. Go to Start > Accessories > System Tools> Disk Defragmenter. Highlight the drive you installed XP on, usually C >click the Defragment button. While you are here you may want to reconfigure or disable Automatic Defrag. When finished shut down and restart. If you use a 3rd party defragmenter, use that instead of Windows defragmenter.
If you do not use a 3rd party defragmenter download PageDefrag and run it.
Step 6:
If you use a drive imaging program, make an image now.
***Step 7:
After 4-7 days of use repeat this section except for Step 3. Then make an image. This will give you a perfect image with prefetching optimized.
Tweaking Windows 7
Installing Windows 7
TweakHound's Super XP Tweaking Guide - SP3 Final
Tweaking Windows Vista
The Right Way To Install Windows XP
Installing Windows Vista
The
Freeware XP Machine
The Vista
Freeware Machine
Windows XP
Backup Strategies For Home Users
Windows Vista Backup Strategies For Home Users
Installing
Suse Linux 10.3
How To Samba With openSUSE 11.2 and Windows

I use True Image 2011 for all my OS backups and Disk Director 11.0 for all my partitioning requirements.
TweakHound readers often get a discount off Acronis Products. Check the links for more info.