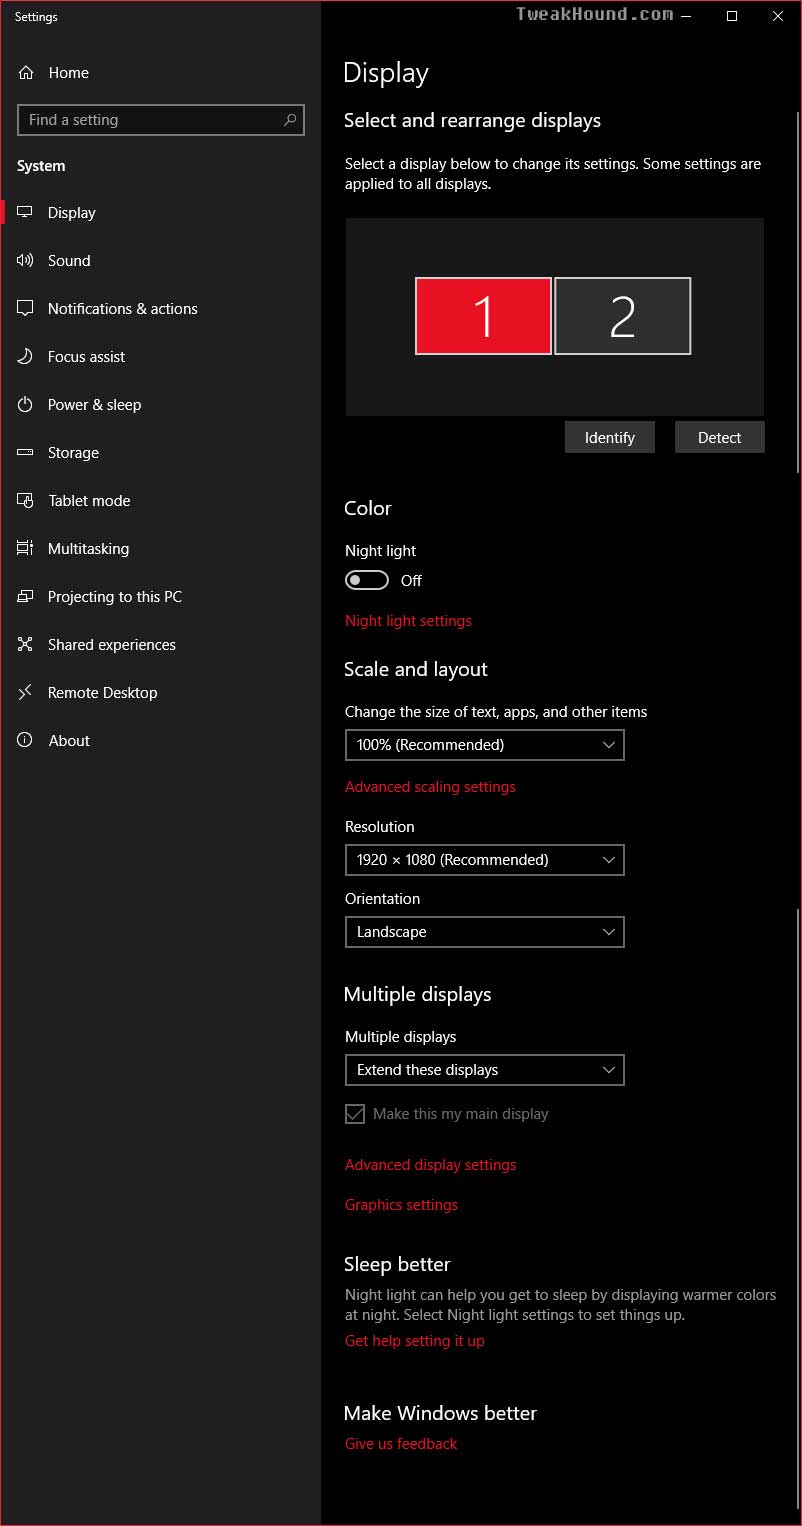
Display Settings
Right-click on your desktop and choose Display settings. This is the same as Notification Center / Action Center icon > All settings > System > Display.

Here you can change scaling, resolution, multiple displays, etc. Again, this screenshot doesn’t appear to match ver. 2004.
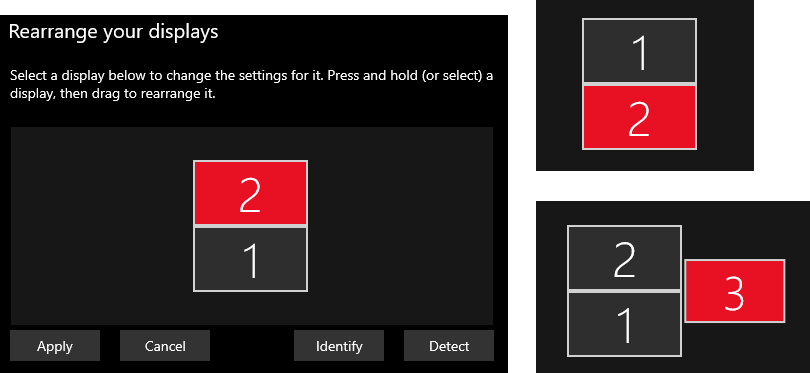
You can click and drag a display to match the physical location of multiple monitors:
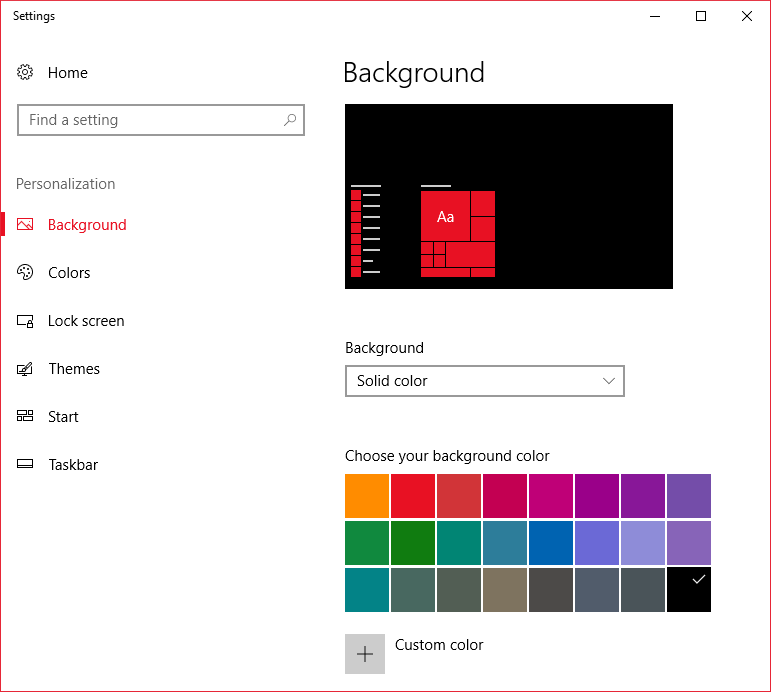
Personalize
Right-click on your desktop and choose Personalize. This is the same as Notification Center / Action Center icon > All settings > Personalization.
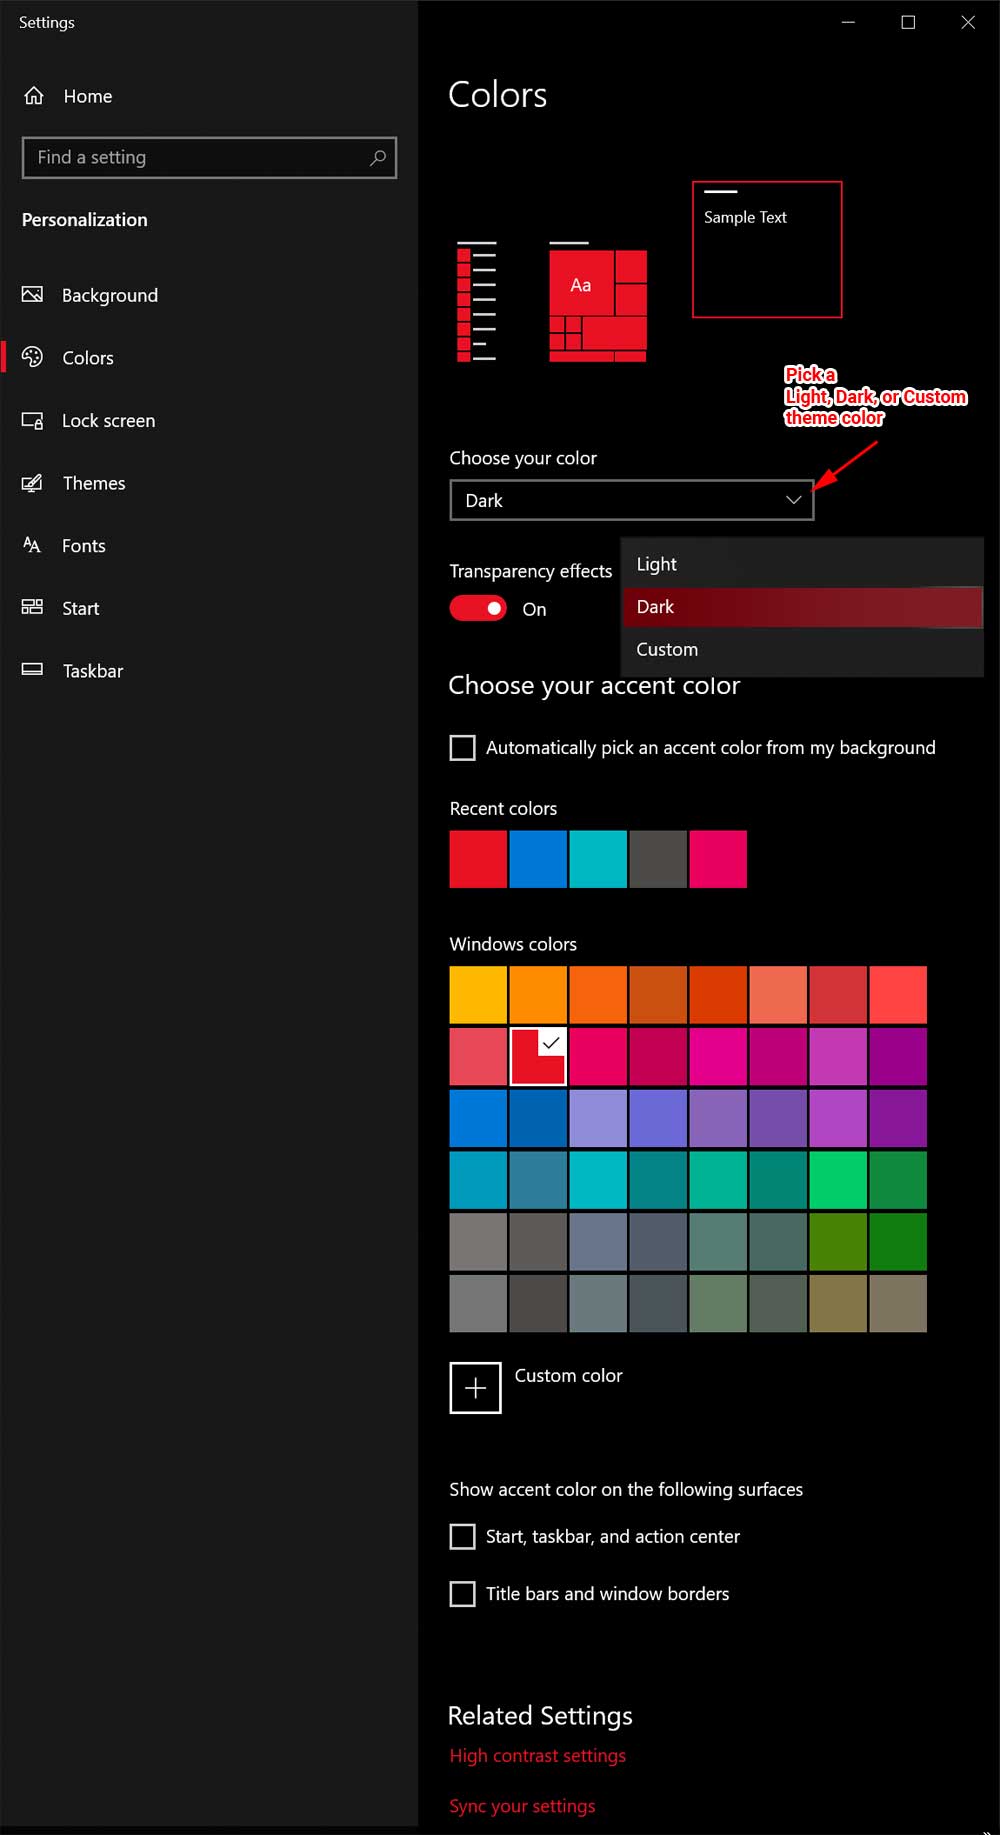
New color options. Here you can set your theme color, set the color for your Start menu, taskbar, Action Center app, and title bars, as well as adjust transparency. (Please stop sending me the registry hack for setting the color of title bars. TH2 added this option here.)
I’m not sure why but there used to be a “Dark” theme, now it’s a color option.
Lock screen settings as well as Screen timeout and screensaver adjustments.
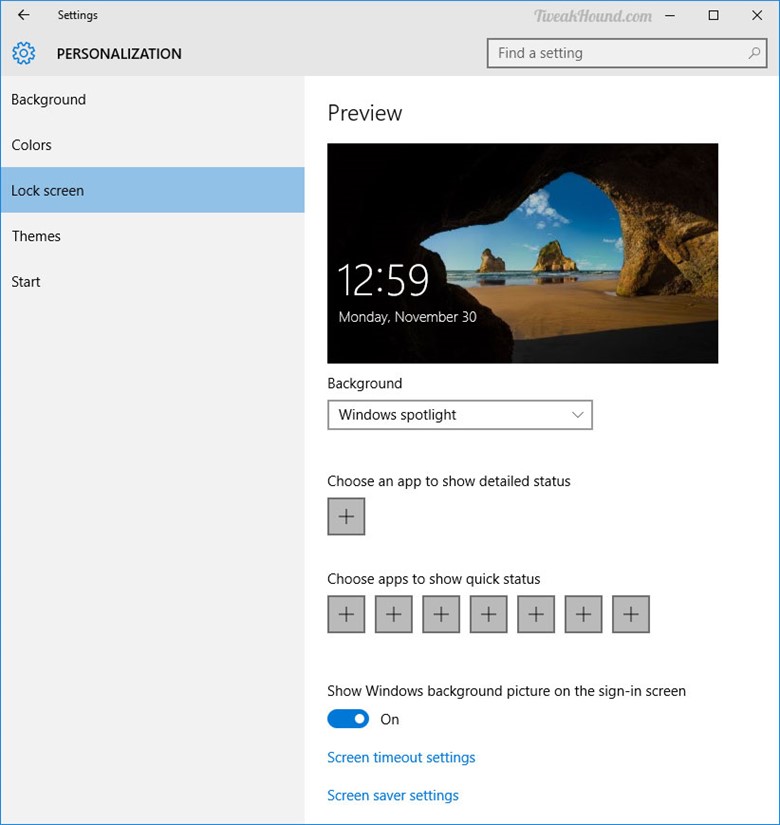
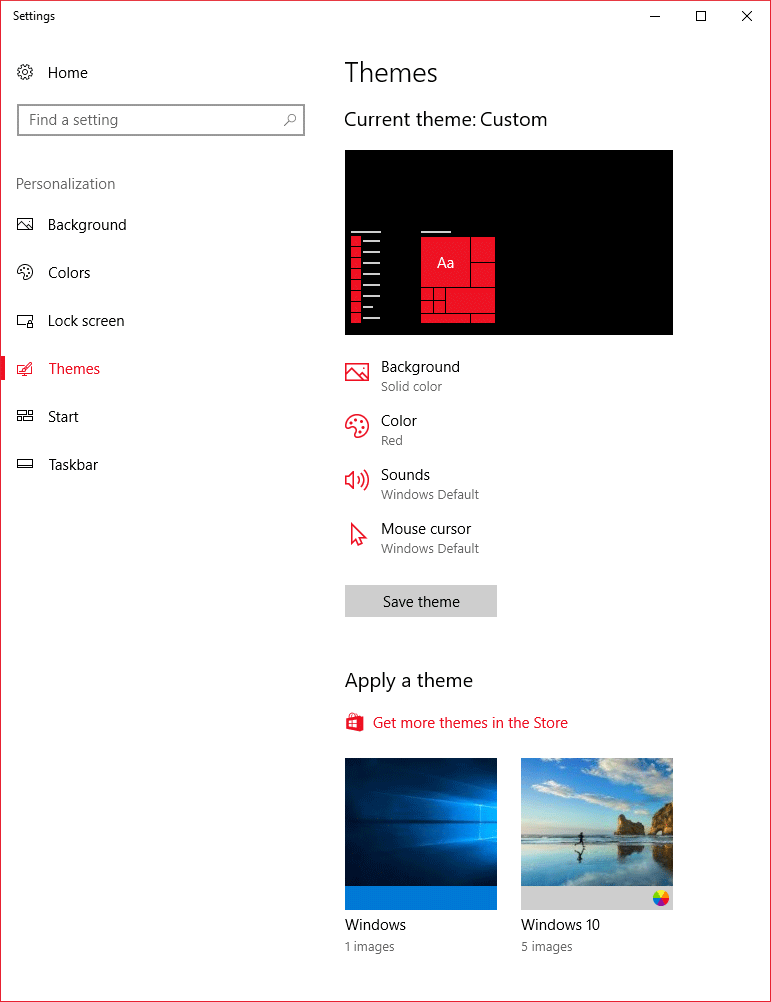
Adjust theme, sound, desktop icons, and mouse pointers
I discuss the Start settings in The Start Menu section of this guide.
The Taskbar
This is the same as right-click on the Taskbar and choose Properties. You can see several options here including a way to move the Taskbar.

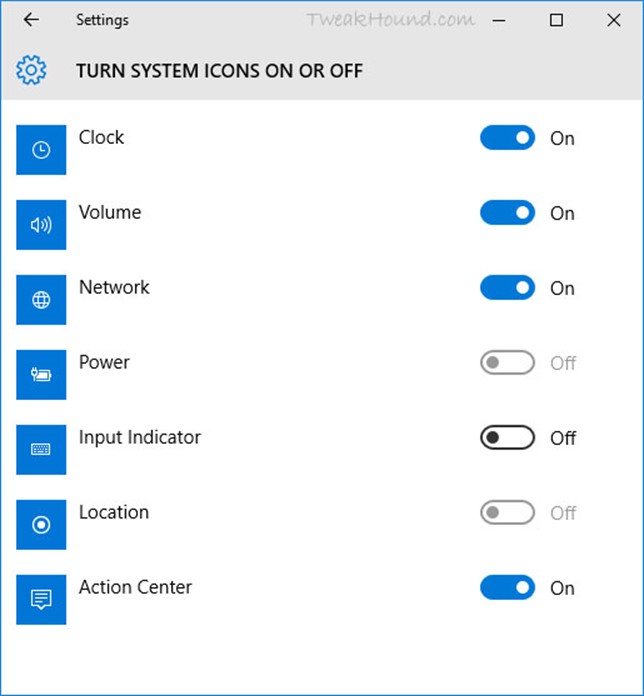
This is the same screen as Notification icon > All settings > System > Notifications.
Here, you can customize notifications and system icons. What you choose is up to you and your annoyance level.
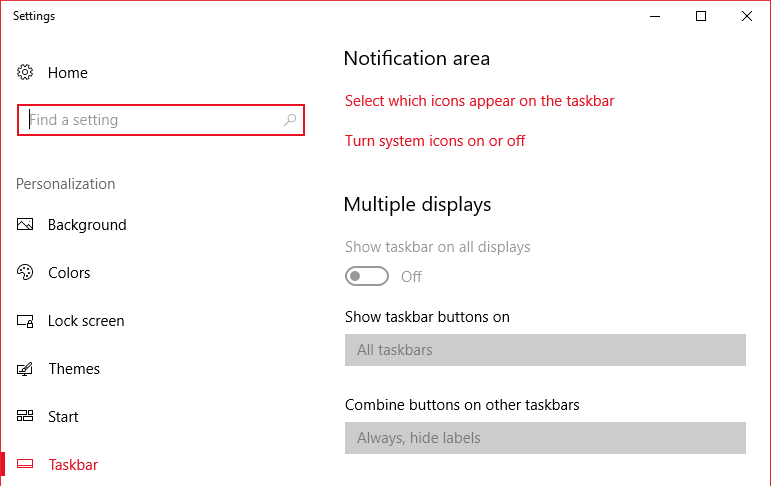
Click Select which icons appear on the taskbar. I like to know everything that is going on with my system so I turn ON Always show all icons in the notification area.
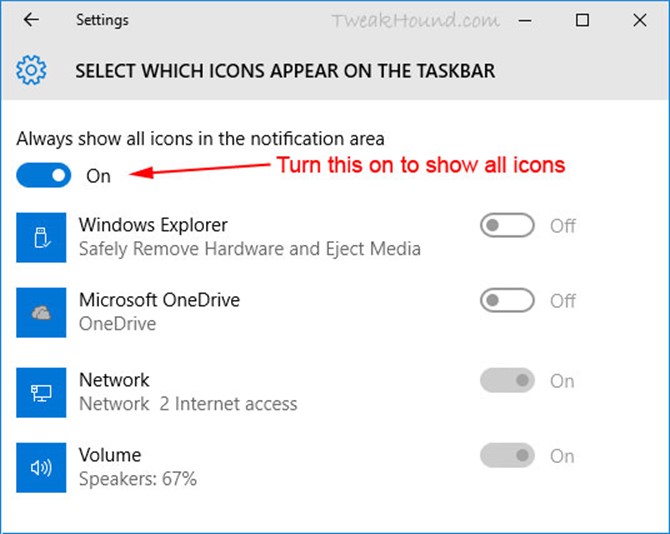
Now go back one step and choose Turn system icons on or off. Available options will differ between a laptop and desktop. Configure it to your preference.
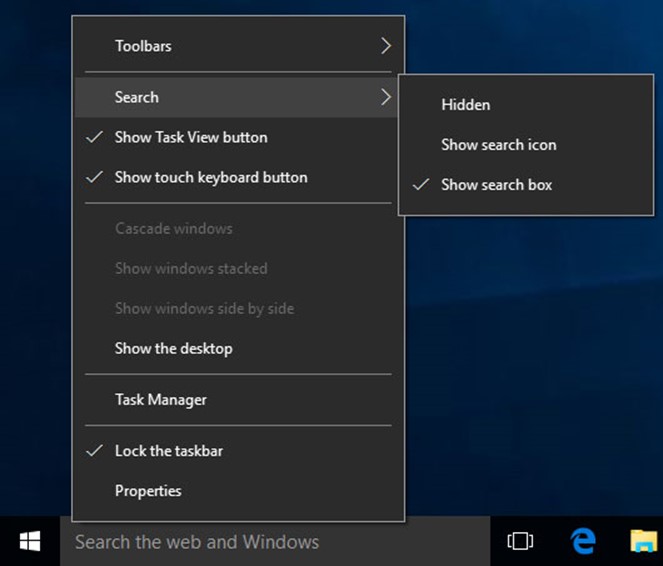
The Search Box
Via right-clicking on the Taskbar you can show it, hide it, or just show an icon.
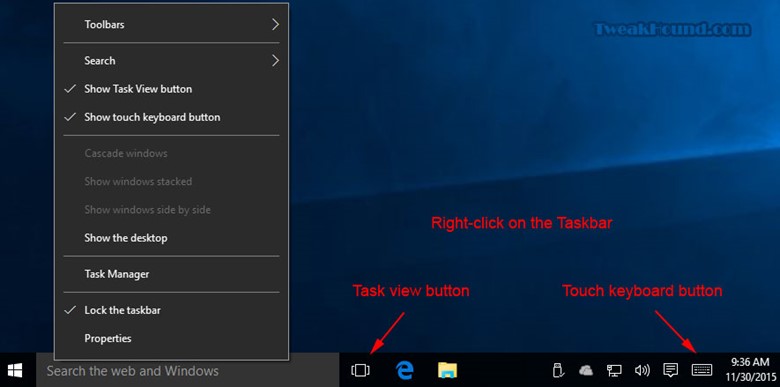
The Task View And Touch Keyboard Buttons
Right-click on the Taskbar. Uncheck Show Task View button and Show touch keyboard button to get rid of them.
Toolbars
You can create Toolbars on the Windows Taskbar.
Right-click on the Taskbar > choose Toolbars > pick one of the defaults or New toolbar…
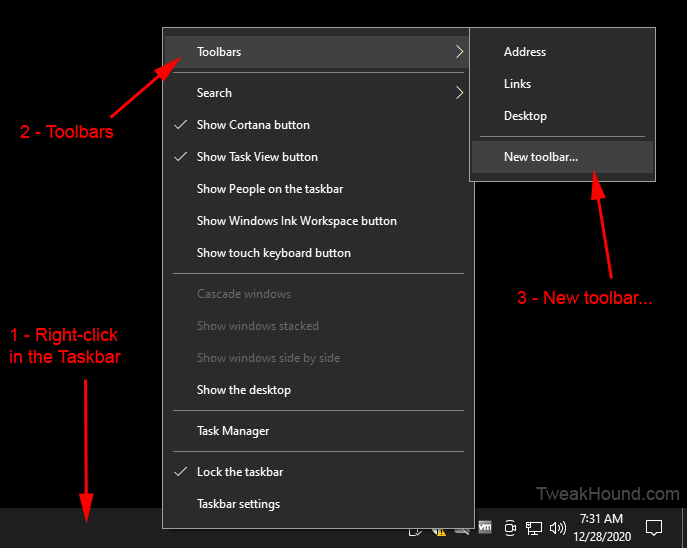
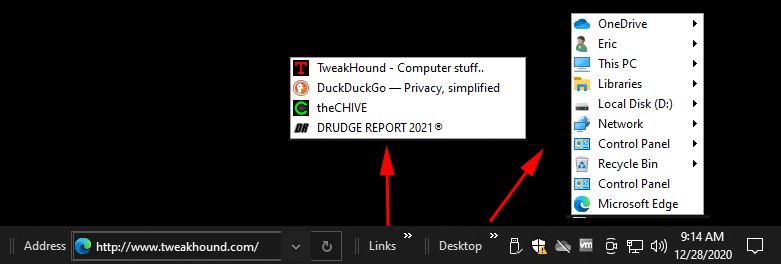
There are 3 default Toolbars: Addresses, Desktop, and Links.
Addresses – You can type a url here. Works just like the Explorer bar.
Desktop – Expands the Desktop Folder as well as many system entries.
Links – Favorite places from Internet Explorer Favorites bar. (AFAIK not Microsoft Edge)
I like to create toolbars to make things more organized and easier to get to. This mostly involves apps and folders that I use frequently. Here are some of mine.
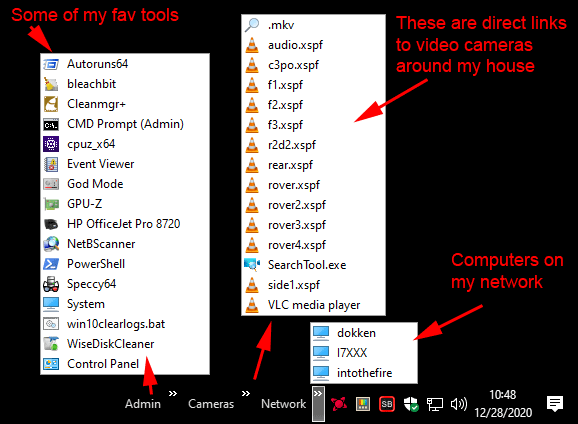
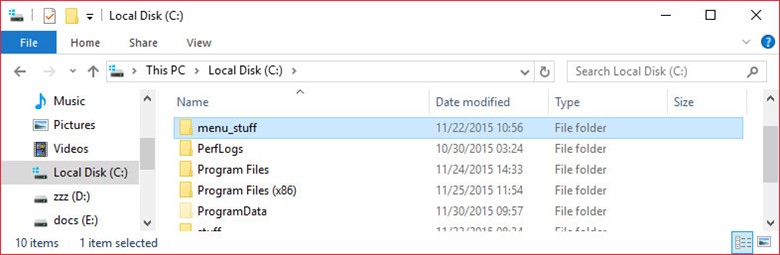
To create my custom Toolbars, I first make a folder in my C: drive called menu_stuff.
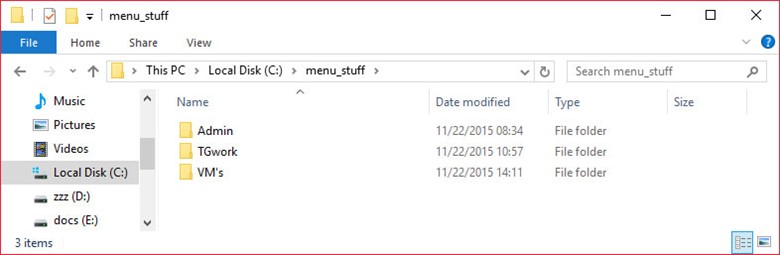
In that folder I create a folder for a specific toolbar(s).

You can fill these folders with shortcuts to apps, or other folders. You then add these by browsing to these folders via the New toolbar… option as mentioned above.
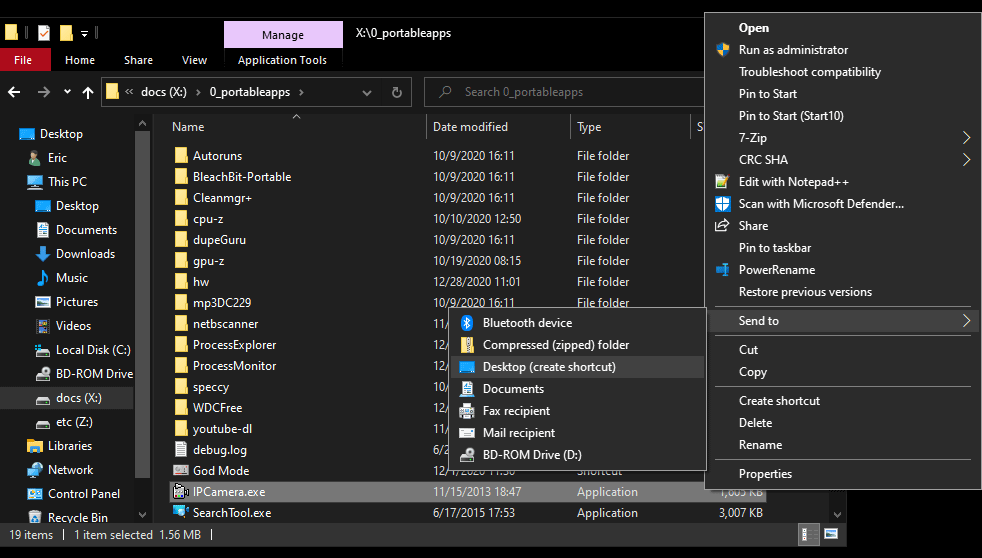
To create links for apps and Control Panel items, right-click (on the app or item) > Send to Desktop (create shortcut).
To create links for administrative tools, drag the icon to the desktop. I then move these shortcuts the folders I just created.
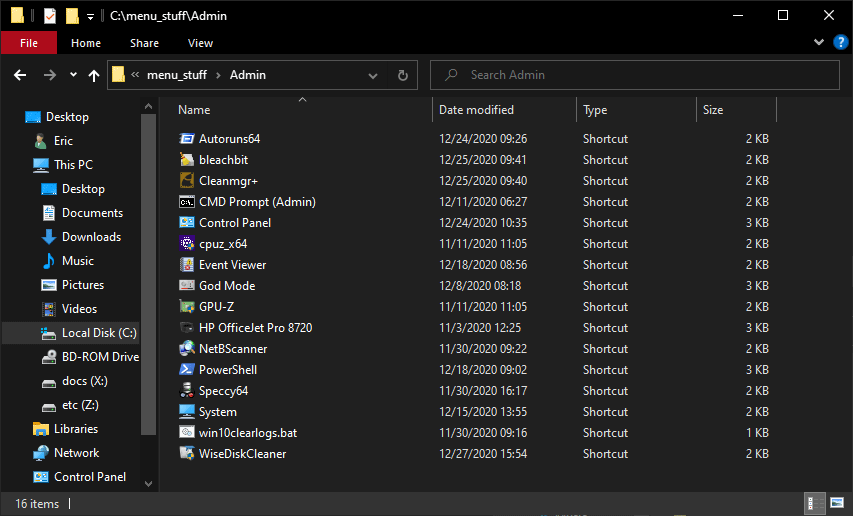
You can add a Toolbar for any folder and it will show the contents of that folder. Here are the contents of my admin menu folder:
Many of the apps I have exist in the folders above as shortcuts. For instance:
In the Admin folder above there is a shortcut to WiseDiskCleaner. The actual app Wise Disk Cleaner is actually in a folder elsewhere where I keep all my portable apps.
I create a shortcut to it, then move that shortcut to the Admin folder. {Right-click > Send to > Desktop (create shortcut)}
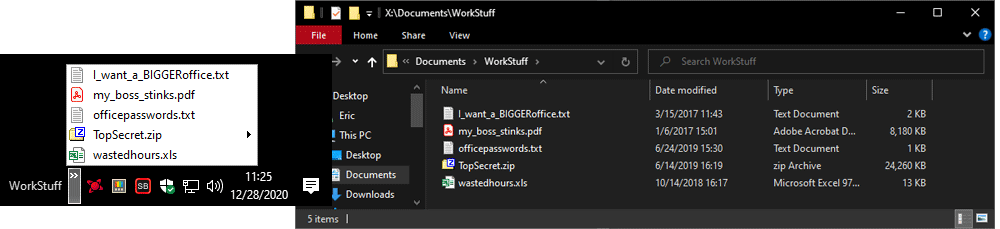
Again, you can create a menu for ANY folder. Let’s say I’ve got some stuff I will be working on for the next month. It is in a folder in the Documents library. Rather than constantly having to navigate there or litter my desktop with shortcuts (grrrrr…), I’ll make a menu item. You just add a toolbar as above and choose that folder:
The Clock
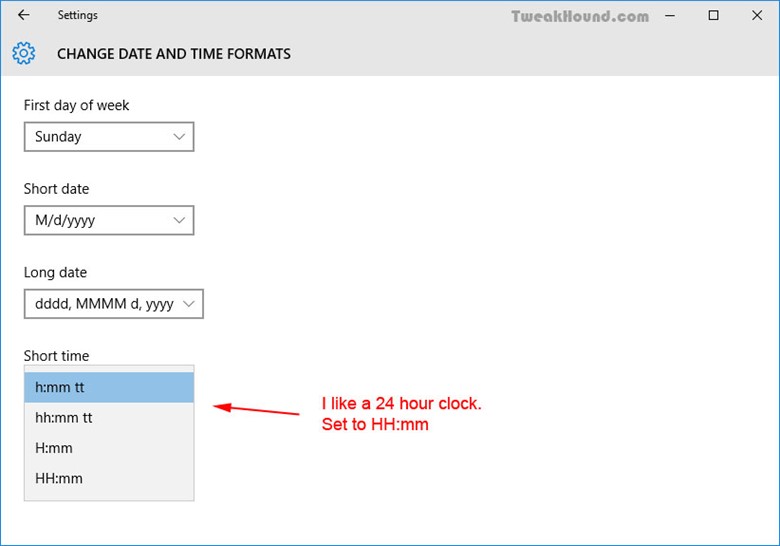
Right-click on the clock > choose Adjust date/time. This is the same as Notification Center / Action Center icon > All settings > Time & language.
Here you can adjust auto time, time zone, and date and time formats. Click Change date and time formats to do so.
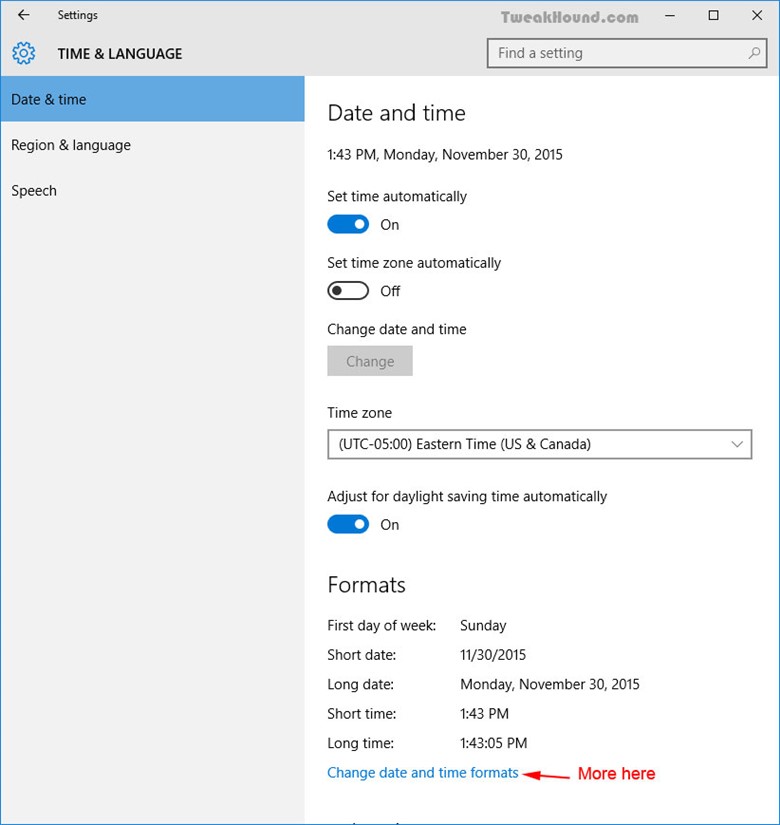
I like a 24-hour clock. To change it set Short time to HH:mm.
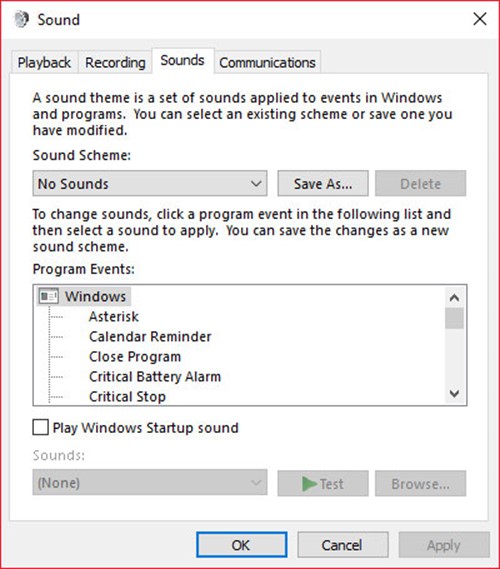
Disable System Sounds
This disables the Sound Scheme. The sound scheme contains things like the sound you hear when you click on something. I’m really not concerned so much with the resources it uses, but I just find the sounds to be annoying. Either way…
Right-click on the Volume icon in your System Tray and choose Sounds > First save your current scheme, click on the Save As… button, enter a name, I used “1”, and click OK > Next, under Sound Scheme: choose No Sounds and click Apply at the bottom right.
![]()
![]()
Hi Eric,
Thanks for a masterpiece again.
I have posted about your guide in my favorite security forum: malwaretips.com
Appreciate the hard work you put in.
Thank you
I went through it page by page. Nicely done.
I notice in your Wise Disk cleaner part your showing version 8, there at version X which has Windows WinSxS (not show in version 8).
not a big deal but thought I mention it.
Hey Eric,
I guess gone are the days where we would pour thru Black Viper’s tables to figure out what to disable. Kudos to BV of course, but it’s nice we don’t have to worry about Windows services all that much anymore.
I would recommend disabling 2 additional services — Remote Registry (maybe I’m old school and this doesn’t matter anymore, but the name of the service is still downright scary), and Connected User Experience & Telemetry (thanks but no thanks MSFT).
Great guide and thanks as always for your efforts,
Steve
Thanks Steve. Remote Registry is disabled by default. Connected User Experiences and Telemetry is taken care of here via O&O Shutup10.
I’ve noticed a small typo on page 17 under File History. The seventh word has an extra ‘s’ in it (constinuously).
Also the grammar of the first sentence does’nt seem quite right. I suggest leaving out the second and third words.
Eric: The registry hack for removing the word “Shortcut” from new shortcuts doesn’t seem to work in my version of Win 10 Pro 64b (20H32 v19042.746 Experience pack 120.2212.551.0). Instead the hex for link appears to operate as an incrementing count. For instance, say the Hex is showing 17 00 00 00 when I open RegEdit; I can set the Hex to 00 00 00 00 but on restart it shows 18 00 00 00. I wonder if it’s me, or MS?
Try:
Windows Registry Editor Version 5.00
[HKEY_CURRENT_USER\SOFTWARE\Microsoft\Windows\CurrentVersion\Explorer]
“link”=hex:1e,00,00,00
Where is the .reg to make the tweaks to a new system?
https://www.tweakhound.com/2020/12/30/tweaking-windows-10-version-20h2/19/
(Libraries) Just an FYI copy pasting the folders to a new location is an unnecessary step. The move dialog will do the work of moving the files in those folders for you, save yourself a couple of seconds and an insignificant amount of bytes on the web.
Peace, Love, Donuts,
Rita
A folder with the name of the library needs to exist in the location you want to move it to. The files are still moved. Copy/paste is just as fast and easy as your way.
Since Windows 10 is funky, if anyone reads these comments I have something to add, particularly for y’all gamers.
#1 Heed the warning and /do/ not remove windows apps from your machine with O&O, user only is enough. It deleted my app manifest so a batch reinstall did not work, and couldn’t find a way to restore it. Windows Store works fine for everything but Cortana, you need to do an extra step to get her back, even if only to disable, its a windows 10 trend that follows to my next suggestion.
#2 Go into gaming settings and just disable Game Mode/Game bar, don’t remove the app from user or computer. While it has no affect, every game you run calls the game bar and will pop an error saying its missing, I assume it has to do with the processes that start up Full Screen Optimizations calling game bar as well, regardless if its disabled it will never load. It is safe to uninstall the console companion.
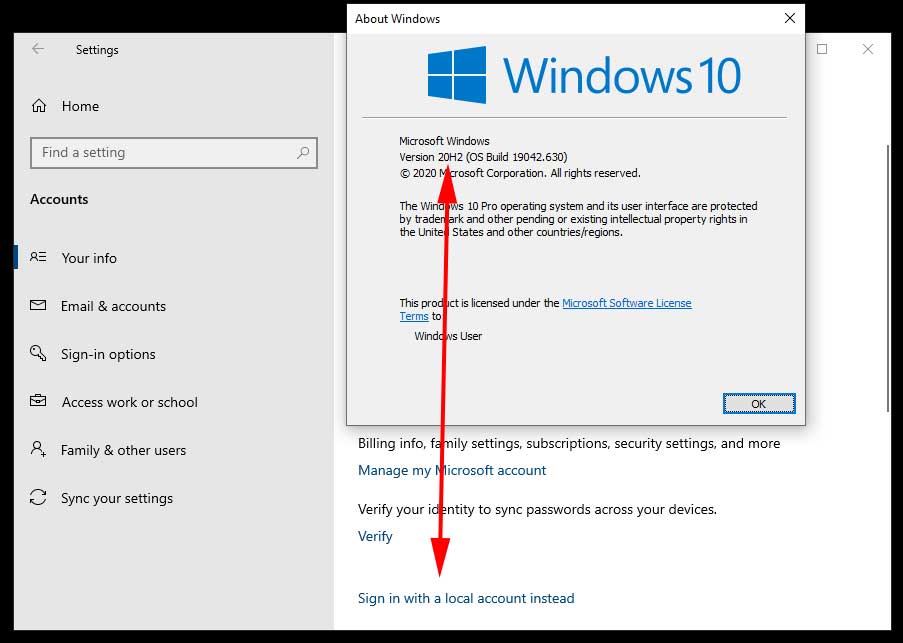
In 20h2 there is no longer the option “sign in with a local account instead” after you have signed in with a Microsoft account. I had a coworker do this by mistake and now I cannot remove his Microsoft account from the workstation. Is there a way to manually remove the Microsoft account?
???
Hi Eric,
you may provide a reg-hack which patches the Windows 10 version number (not product key) to a recent one?
Reason:
MS does not deliver any apps via [Get], in my case today the free HTML5 Video Downloader by Arcadio Garcia (link below),
if they do not meet version # 10586.0 at least.
Last December I updated the OS for the sake of another app which left me in a total language mix, missing device and BT manager, a deliberate removed group policy editor (gpedit) but a proper reinstalled Cortana, Edge and all the other stuff MS cr*ps users lawn with.
Hence I re-installed my former shutupped/winslapped and outbound firewall protected v10240 again but been left in the rain
now when it comes to add simple addons from MS.
There is no rason whatsoever a downloader or else shan’t run on even older version than mine, just the usual
MS ignorance driven by complacency.
Your sincerely
Michael Damian
AFAIK there is no permanent way to do this.
Cheers Eric,
maybe the Hound digs that out one day 😉
Take care.
Nice and cool guide!
I just wanted to offer a tool for better power plan settings editing
https://forums.guru3d.com/threads/windows-power-plan-settings-explorer-utility.416058/