How To Use SyncToy
SyncToy is a free backup tool from Microsoft. It features many backup options, can run over your network, and can be scheduled.
First Steps
1 – Download Microsoft SyncToy. Then install it.
2 – Run Windows Update. SyncToy uses both Microsoft .NET framework and Microsoft Sync Framework which may need to be updated after install.
Using SncToy
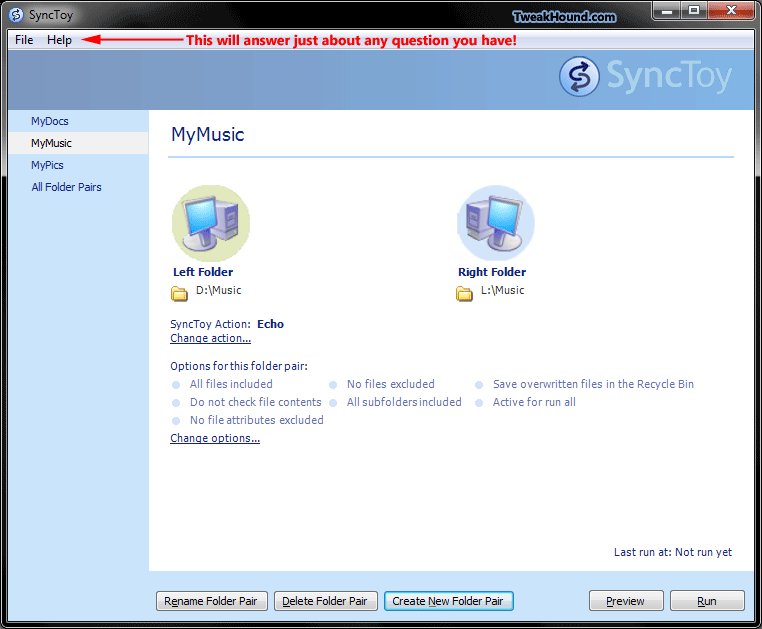
Start SyncToy. To create a new backup click the Create New Folder Pair button.

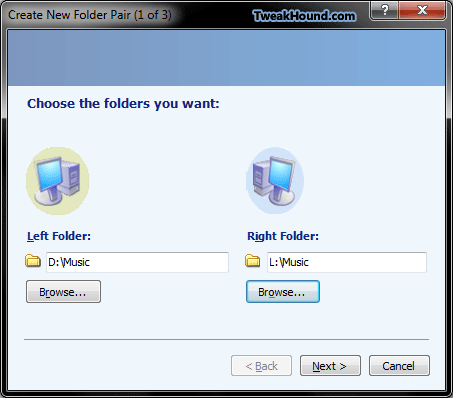
Left Folder – Browse the folder you want to backup. Right Folder – Browse to where you want to save it to.
Then click Next.

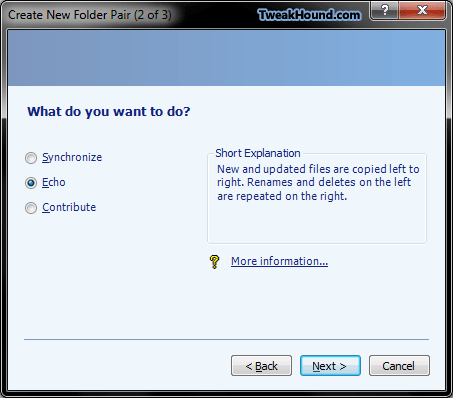
Choose a backup plan and the click Next.
Definitions of SyncToy Actions
Synchronize: New and updated files are copied both ways. Renames and deletes on either side are repeated on the other.
Echo: New and updated files are copied left to right. Renames and deletes on the left are repeated on the right.
Contribute: New and updated files are copied left to right. Renames on the left are repeated on the right. No deletions.
For more info see the Definitions of SyncToy Actions section in SyncToy Help.

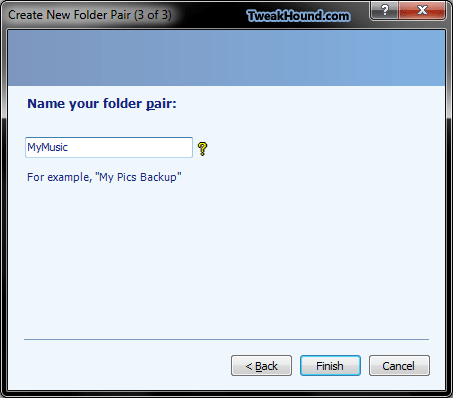
Pick a name you will recognize. If you want to schedule it then avoid using spaces (it will be easier).
Click Finish.

— The following is copied straight from the SyncToy help file. I simply extracted the .chm and copy/pasted the contents of the schedulejobs.htm file —
Schedule SyncToy
While you do not have to schedule SyncToy to use it, some users may find it helpful to schedule recurrent SyncToy runs. Perhaps you have a folder pair that takes a long time to sync and you want to run SyncToy in the middle of the night, for example.
SyncToy does not provide a user interface to schedule folder pairs to run at designated times. However, there is a method to schedule tasks using the Microsoft© Windows© operating system.
Windows Vista/ Win7
To schedule a task using the operating system:
- From the Start menu, select All Programs – Accessories – System Tools – Task Scheduler.
- Select Create Basic Task in the Actions pane on the right.
- Add a Name and Description and select Next.
- Choose when you want the task to start and select Next.
- Choose date/times (if applicable) to run task and select Next.
- Choose Start a Program option and select Next.
- Select Browse and locate the SyncToyCmd.exe.
- Type “-R” in the Add Arguments textbox. –R all by itself will run all folder pairs that are active for run all. If you want to run just a single folder pair, add –R “My Pair” to the end of the command line. If the folder pair name contains a space, surround it with quotation marks, as the example above shows. For another example, assume that SyncToy is in the folder named C:\Program Files\SyncToy 2.1\ and that you want to run a folder pair named “My folder pair.” Enter the command line as follows, including the quotation marks: “C:\Program Files\SyncToy 2.1\SyncToyCmd.exe” -R “My folder pair.” Note that there are two sets of quotation marks in this case: one is around the path to the SyncToy program file and the other surrounds the folder pair name.
Windows XP
To schedule a task using the operating system:
- From the Start menu, select All Programs – Accessories – System Tools – Scheduled Tasks.
- Select Add scheduled task to start the Scheduled Task Wizard. You will see a list of possible programs to run.
- Select Browse and locate the SyncToyCmd.exe.
- The wizard will next prompt you to enter how often you want to run the scheduled SyncToy (for example, daily, weekly, et cetera). Select a frequency.
- The next page asks when to start the task. Select a start time.
- The next page asks for the user name and password to run the program under. Enter your user name and password.
- The final page contains an option to open the properties dialog when the wizard ends. Select this checkbox.
- Modify the Run textbox to include the –R command line option. –R all by itself will run all folder pairs that are active for run all. If you want to run just a single folder pair, add –R “My Pair” to the end of the command line. If the folder pair name contains a space, surround it with quotation marks, as the example above shows. For another example, assume that SyncToy is in the folder named C:\Program Files\SyncToy 2.1 and that you want to run a folder pair named “My folder pair.” Enter the command line as follows, including the quotation marks: “C:\Program Files\SyncToy 2.1\SyncToyCmd.exe” -R “My folder pair.” Note that there are two sets of quotation marks in this case: one is around the path to the SyncToy program file and the other surrounds the folder pair name.
With this version of SyncToy, it is now possible to schedule execution of a folder pair in the following scenarios:
- No one is currently logged into the machine.
- A different user is logged into the machine.
— End copy —
-END-