
• Skip to primary navigation
  • Skip to main content
  • Skip to primary sidebar

TweakHound

Computer stuff...

  • Home
  • Windows XP
  • Windows Vista
  • Windows 7
  • Windows 8
  • Windows 10
  • Windows 11
  • Linux
  • Tweak Guides
  • Site Info
    • About
    • About Me
    • TweakHound’s World
    • Contact
    • My Computers
    • Old Articles
    • Privacy Policy
    • Old Index
    • Advanced Search

Upgrade To Win10 And Keep Previous Windows Version

th

February 6, 2016, 11:39(EST) By Eric (a.k.a. TweakHound)

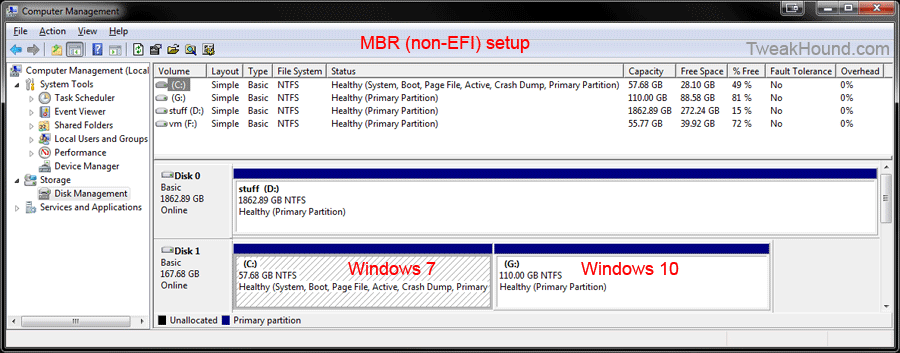
thI’m going to show you how I upgraded to Windows 10 and kept my Windows 7 install. I alluded to this method earlier. Although not tested this should work for Windows 8.1 too.
I searched the Windows 10 EULA and I can find nothing that restricts this but I’m not a lawyer either.

1 – Fully update Windows 7 (or 8.1). This means Windows Update as well as drivers (and BIOS too).
2 – Clean Windows using cleanmgr and CCleaner.
3 – Shrink Windows 7 partition.
4 – Boot to Acronis True Image flash drive (CD/DVD will work too) and image ENTIRE disk.
5 – Reboot and install Win10. Fully update. You can do a reset here too if you want a “clean” install.
6 – Reboot to Acronis True Image. Restore OS partition ONLY to the blank space on the drive.
7 – Reboot to Win10. Download and install EasyBCD.
8 – Add Windows 7 to boot options.
9 – Success!

I’ve also put Win10 as the restored/2nd partition:
1 – Fully update Windows 7 (or 8.1). This means Windows Update as well as drivers (and BIOS too).
2 – Clean Windows using cleanmgr and CCleaner.
3 – Shrink Windows 7 partition.
4 – Boot to Acronis True Image flash drive (CD/DVD will work too) and image ENTIRE disk.
5 – Reboot and install Win10. Fully update. You can do a reset here too if you want a “clean” install.
6 – Reboot to Acronis True Image.
– Backup ENTIRE Win10 disk.
– Restore ENTIRE backup from step 4.
– Restore Win10 partition ONLY to the blank space on the drive.
7 – Reboot to Windows 7. Download and install EasyBCD.
8 – Add Win10 to boot options.
9 – Success!

If you have problems shrinking your OS partition. Do advanced disk cleanup and temporarily disable page file.

I assume you can use Clonezilla for this too but I haven’t tried it. If you do please let me know.
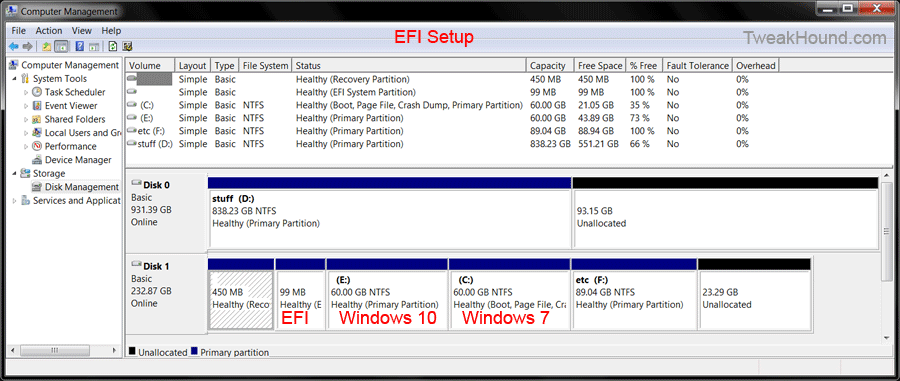
7and10_a1

7and10_b1

Tagged With: How-To's, This Site, Windows 10, Windows 7, Windows 8

Reader Interactions

Comments

  1. JackL says

    February 6, 2016, 11:49(EST) at 11:49

    The easiest way is to feed Win 7 serial into Win 10 ISO, install it and keep each version on a separate drive.

    • Eric (a.k.a. TweakHound) says

      February 6, 2016, 11:55(EST) at 11:55

      Except you lose your programs.
      It may not activate.
      And that method in fact may violate the EULA. Again, I’m not a lawyer.

  2. JackL says

    February 6, 2016, 12:15(EST) at 12:15

    Yes, I had to install all the programs from scratch. Not a bad thing since one will immediately know if there are compatibility issues. Win 10 ISO actually DID request that I feed it Win 7 Pro SN. It then upgraded me to Win 10 Pro that I am on now. No EULA issue.

  3. ThomasK2 says

    February 6, 2016, 20:53(EST) at 20:53

    I did my notebook just like your first setup. I have done many windows 10 installs. They were all upgrades and they have no issues.

Primary Sidebar

Popular Articles

Windows 10

Tweaking Windows 10

My Windows 10 Tweaks

Windows 10 Privacy Settings

Win10 Diagnostics Tracking Service Gone?

Windows 10 Advanced Disk Cleanup

Win10 Customize Installation Options

Windows 10 Dark Theme

Win10 Wallpapers, Graphics, etc.

All Windows 10 Articles

Windows 8

Tweaking Windows 8.1

Advice On Installing Windows 8.1

Clean Install Windows 8.1

Cleanup After Windows 8.1 Upgrade

Create Shutdown, Restart, Logoff Tiles For Windows 8

Tweaking Windows 8

Install Windows 8 – Clean Install With Upgrade Media

Install Windows 8 – Upgrade

Windows 8 – Cleaning Up After You’ve Upgraded

Windows 8 Freeware Machine

Windows 8 SSD Settings, Etc.

How To Resize Your Windows 8 Partition

Create Windows 8 Recovery Media

Windows 8 – Elevated Command Prompt

How To Fix The Windows Bootloader

Windows 7

Installing Windows 7

Tweaking Windows 7

Windows 7 Diagnostics Tracking Service

The Windows 7 Freeware Machine

The Windows 7 Pagefile And Running Without One

Bad Tweaks

SSD Tweak Guide (sort of)

The noguiboot (no GUI Boot) Tweak

NtfsMemoryUsage=2 Tweak

More Windows 7 articles here.

Windows Vista

Installing Windows Vista

Tweaking Windows Vista

More Windows Vista articles here.

Windows XP

eXPired - The Last Windows XP Guide You'll Ever Need

The Right Way To Install Windows XP

Super XP Tweaking Guide

The Freeware XP Machine

Bad Tweaks

More XP Articles here and here.

Backup

Backup Article Greatest Hits – Vol. 1

Other

Cataloging Your Music Collection

Finding Good Album Art

Converting Vinyl Records To Digital Music – A Non-Audiophiles Guide

Windows All-In-One Recovery Flash Drive

SSD Tweak Guide (sort of)

Raidmax Blackstorm Case Review

Disk Partitioning

Ditch Those CD's! A Guide To Using USB Flash Drives

Checking Your Disks For Problems

Bad Tweaks

More articles here

Tags

Android Backup Beer Computer Hardware Computer News Cool Tools Freeware How-To's Linux Off Topic openSUSE Playlists Privacy Security Software This Site vacation Veterans Windows 7 Windows 8 Windows 10 Windows 11 Windows Vista Windows XP

TweakHound - Optimize Your Computing Experience! TweakHound - Optimize Your Computing Experience!

Copyright 2002-2025 by Eric Vaughan All material contain here is the property of the materials owner. Windows, Windows XP, Windows Vista, Windows Seven, Windows 8, Windows 10, Windows 11, Microsoft, and all associated logos are trademarks/property of Microsoft. You may not use or copy any material from tweakhound.com without expressed written permission. Hotlinking to any material within this site is forbidden. Privacy Policy