
• Skip to primary navigation
  • Skip to main content
  • Skip to primary sidebar

TweakHound

Computer stuff...

  • Home
  • Windows XP
  • Windows Vista
  • Windows 7
  • Windows 8
  • Windows 10
  • Windows 11
  • Linux
  • Tweak Guides
  • Site Info
    • About
    • About Me
    • TweakHound’s World
    • Contact
    • My Computers
    • Old Articles
    • Privacy Policy
    • Old Index
    • Advanced Search

Clean Install Windows 8.1

thpinpostlogo

October 21, 2013, 16:11(EDT) By Eric (a.k.a. TweakHound)

thpinpostlogoThe workaround to download Windows 8.1 surfaced over the last few days.
Origin unknown (That means credit / blame ain’t mine).
Lots of places have posted the instructions to download but left you hanging after that.
Thats where this post comes in.

Requirements:
1 – The Windows 8.1 generic key. ( https://www.google.com/#q=Windows+8.1+generic+key )
2 – Your genuine Windows 8 key.

I have found the best results by doing this from Windows 8 and not an earlier version of Windows.


Download

1 – Using Internet Explorer, go here: http://windows.microsoft.com/en-us/windows-8/upgrade-product-key-only
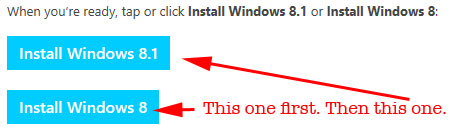
2 – Click the Install Windows 8 button. NOT the Install Windows 8.1 button.
3 – When presented with the run/save option, choose RUN.
4 – Enter your genuine Windows 8 key.
5 – When the download begins exit/close the window.
6 – Go back here: http://windows.microsoft.com/en-us/windows-8/upgrade-product-key-only
7 – This time click the Install Windows 8.1 button.
8 – Once downloaded the program will come to the Install Windows 8.1 screen. Choose Install by creating media.
9 – Choose the appropriate media type: USB flash drive or ISO
(I actually did both by rerunning the setup via the icon created by the program on the desktop.
win81_cln_nstal_1


Installation

I did my install on my laptop. After backing up, I switched the BIOS from legacy to UEFI / secure boot. I wiped the disk by booting from the USB key I created and doing diskpart.

1 – Disconnect the computer from the internet.

2 – Diskpart (optional):

***PAY ATTENTION TO EVERYTHING IN THIS SECTION***

We are going to use diskpart. It is an advanced utility that can wipe out your stuff with the press of a key.
There are no “are you sure” ,double-check pop-ups. When you press ENTER thats it.
If you are using a computer with multiple drives you may want to disconnect them before running diskpart (with the computer off).
Keep in mind. Disks are numbered starting at 0. Partitions are numbered starting at 1.
( [ENTER] means press the Enter key ):

– Boot from your installation media.

– Choose Choose Repair your computer > Click Advanced options > Click Command Prompt

– Type > diskpart

– Type > list disk    [ENTER]    If you are on a multiple disk system find your main disk (be sure).

– Type > select disk 0    [ENTER]    (where the disk number is the number of your main disk).

***WARNING – this next step WILL WIPE YOUR DRIVE. ALL, I REPEAT ALL, INFO WILL BE LOST.

– Type > clean    [ENTER]

3 – Reboot (still disconnected from the internet) and install Windows 8.1 with the generic key.


Activate Windows 8.1

– After install, connect to internet.

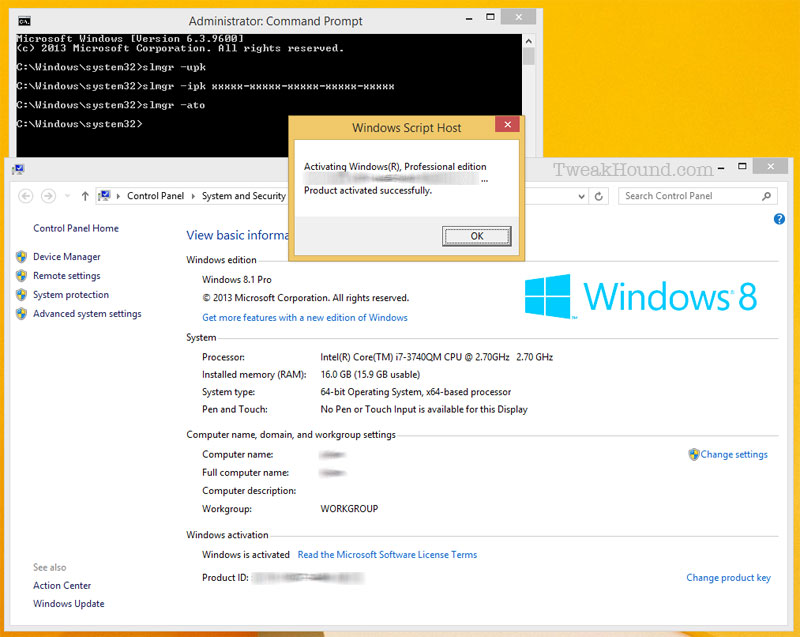
– Run the following commands from an elevated command prompt (   Win + X key Command Prompt (Admin)   ).
( [ENTER] means press the Enter key ):

slmgr -upk
[ENTER] (this removes the install key)

slmgr -ipk +CDKEY
[ENTER]
(the +CDKEY is your original, legitimate CD Key with dashes. XXXXX-XXXXX-XXXXX-XXXXX-XXXXX. Do not use the plus sign.)

slmgr -ato
[ENTER] (this starts online activation)
win81_cln_nstal_act


-END-

Tagged With: How-To's, This Site, Windows 8

Primary Sidebar

Popular Articles

Windows 10

Tweaking Windows 10

My Windows 10 Tweaks

Windows 10 Privacy Settings

Win10 Diagnostics Tracking Service Gone?

Windows 10 Advanced Disk Cleanup

Win10 Customize Installation Options

Windows 10 Dark Theme

Win10 Wallpapers, Graphics, etc.

All Windows 10 Articles

Windows 8

Tweaking Windows 8.1

Advice On Installing Windows 8.1

Clean Install Windows 8.1

Cleanup After Windows 8.1 Upgrade

Create Shutdown, Restart, Logoff Tiles For Windows 8

Tweaking Windows 8

Install Windows 8 – Clean Install With Upgrade Media

Install Windows 8 – Upgrade

Windows 8 – Cleaning Up After You’ve Upgraded

Windows 8 Freeware Machine

Windows 8 SSD Settings, Etc.

How To Resize Your Windows 8 Partition

Create Windows 8 Recovery Media

Windows 8 – Elevated Command Prompt

How To Fix The Windows Bootloader

Windows 7

Installing Windows 7

Tweaking Windows 7

Windows 7 Diagnostics Tracking Service

The Windows 7 Freeware Machine

The Windows 7 Pagefile And Running Without One

Bad Tweaks

SSD Tweak Guide (sort of)

The noguiboot (no GUI Boot) Tweak

NtfsMemoryUsage=2 Tweak

More Windows 7 articles here.

Windows Vista

Installing Windows Vista

Tweaking Windows Vista

More Windows Vista articles here.

Windows XP

eXPired - The Last Windows XP Guide You'll Ever Need

The Right Way To Install Windows XP

Super XP Tweaking Guide

The Freeware XP Machine

Bad Tweaks

More XP Articles here and here.

Backup

Backup Article Greatest Hits – Vol. 1

Other

Cataloging Your Music Collection

Finding Good Album Art

Converting Vinyl Records To Digital Music – A Non-Audiophiles Guide

Windows All-In-One Recovery Flash Drive

SSD Tweak Guide (sort of)

Raidmax Blackstorm Case Review

Disk Partitioning

Ditch Those CD's! A Guide To Using USB Flash Drives

Checking Your Disks For Problems

Bad Tweaks

More articles here

Tags

Android Backup Beer Computer Hardware Computer News Cool Tools Freeware How-To's Linux Off Topic openSUSE Playlists Privacy Security Software This Site vacation Veterans Windows 7 Windows 8 Windows 10 Windows 11 Windows Vista Windows XP

TweakHound - Optimize Your Computing Experience! TweakHound - Optimize Your Computing Experience!

Copyright 2002-2025 by Eric Vaughan All material contain here is the property of the materials owner. Windows, Windows XP, Windows Vista, Windows Seven, Windows 8, Windows 10, Windows 11, Microsoft, and all associated logos are trademarks/property of Microsoft. You may not use or copy any material from tweakhound.com without expressed written permission. Hotlinking to any material within this site is forbidden. Privacy Policy