
Windows 8 Networking
Sharing
Just a few quick notes here. Please see Windows 7 Home Networking FAQ’s (applies to Windows 8 too).
There are 2 types of sharing options in Windows 8: the Home Group or Advanced sharing. They can both be used at the same time.
My recommendation is that most users that want to share files at home use the Home Group. Advanced sharing requires knowledge of file and share permissions that usually aren’t necessary for home users (if you have to ask then you shouldn’t be using it).
See: HomeGroup from start to finish
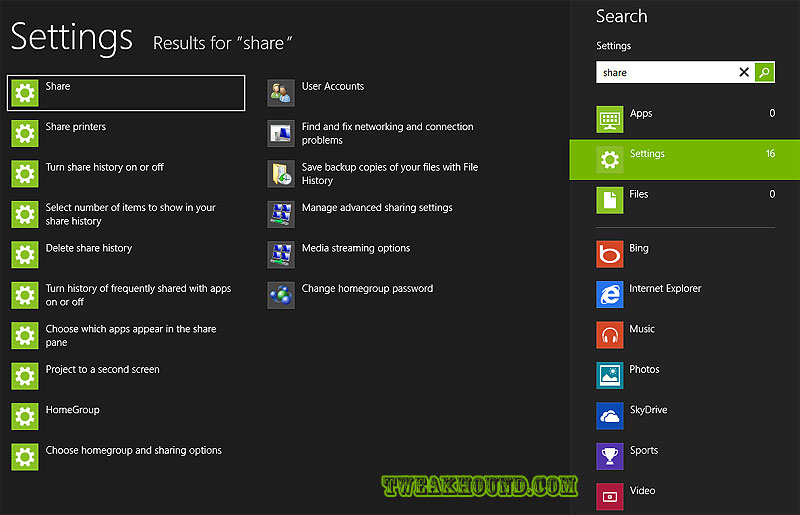
My best advice to find answers to all your Windows 8 search questions is to use the Search charm and type share:
Disable The Home Group
First leave the Home Group. To do this go to the Settings charm > Change PC Settings > HomeGroup > Leave. Windows 8 enables the HomeGroup Provider service by default. If you are not using the Home Group then disable this: Press the Windows + R keys and type services.msc > double-click and disable the HomeGroup Provider service.
Windows 8 Network Tweaks
There are two ways to adjust network settings in Windows 8. I’ll call them The New Way and The Old Way. The New Way adjust networking services at the OS level. The Old Way adjusts services at the actual adapter. I use both ways.
*These tweaks will not increase performance or increase download speed. So why tweak it? The tweaks here are designed to cut down on network chatter and to secure your box (see here for an example of the chatter I’m talking about). Let me make this clear though. I’ve seen no network performance improvement using these tweaks and I do not believe any home users will. These settings do not cover Services, for those see the Services section of this guide.
The New Way
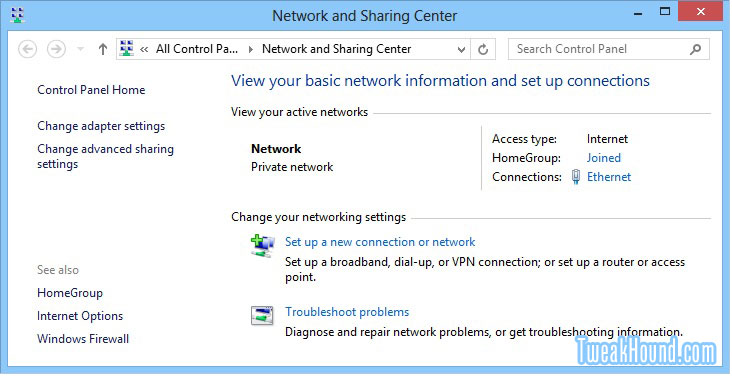
Open Network and Sharing Center
From the desktop, right-click on the network icon in the taskbar > choose Open Network and Sharing Center. Or
Search charm > type Network and Sharing Center
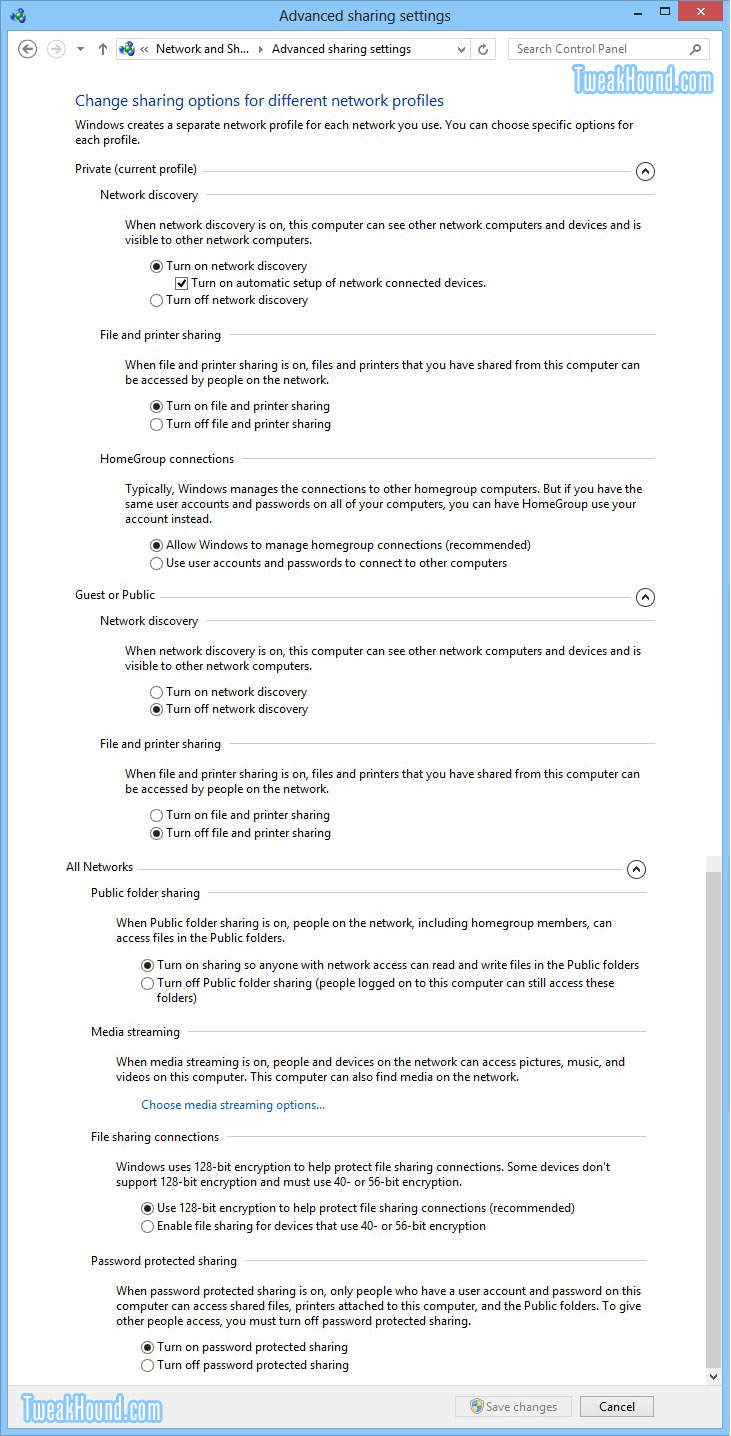
Next, click on Change advanced sharing settings.
I’m going to make this really easy. If and only if you aren’t networked, select every “Turn off” box and click the Save changes button. If you are networked to any sort of computer, device, etc. then skip to The Old Way.
The Old Way
I do not recommend the average user attempt these tweaks.
Again, a warning. Backup your computer before doing these. The purpose of these tweaks is specifically to remove functionality. Understand before acting!
Possible settings to disable:
Client for Microsoft Networks
This IS the Workstation Service. This service is complex and third party applications may depend on this being there.
Disabling this is often recommended for SERVER hardening.
Essential if networked.
If you are going to disable this I highly recommend:
Doing this tweak completely separate from all other actions, and,
disabling this, File and Printer Sharing for Microsoft Networks, rebooting and checking all your applications and error logs.
Very advanced users may also want to block the associated ports via the firewall.
QOS
Unneeded for the home user, (and in truth is unused in most home environments).
File and Printer Sharing for Microsoft Networks
Needed if you connect to another computer or vice versa. (see Client for Microsoft Networks above)
Microsoft Network Adapter Multiplexor Protocol
Not enabled by default. Unneeded in home environment. Used for network teaming
Internet Protocol Version 6 (TCP/IPv6)
For many users this is an essential component. HomeGroup, VPN, DirectAccess and other parts of the operating system use this.
You should keep ipv6 enabled even if your ISP doesn’t provide ipv6 connectivity yet.
The Argument against Disabling IPv6
It is unfortunate that some organizations disable IPv6 on their computers running Windows Vista or Windows Server 2008, where it is installed and enabled by default. Many disable IPv6-based on the assumption that they are not running any applications or services that use it. Others might disable it because of a misperception that having both IPv4 and IPv6 enabled effectively doubles their DNS and Web traffic. This is not true.
From Microsoft’s perspective, IPv6 is a mandatory part of the Windows operating system and it is enabled and included in standard Windows service and application testing during the operating system development process. Because Windows was designed specifically with IPv6 present, Microsoft does not perform any testing to determine the effects of disabling IPv6. If IPv6 is disabled on Windows Vista, Windows Server 2008, or later versions, some components will not function. Moreover, applications that you might not think are using IPv6 such as Remote Assistance, HomeGroup, DirectAccess, and Windows Mail could be.
Therefore, Microsoft recommends that you leave IPv6 enabled, even if you do not have an IPv6-enabled network, either native or tunneled. By leaving IPv6 enabled, you do not disable IPv6-only applications and services (for example, HomeGroup in Windows 7 and DirectAccess in Windows 7 and Windows Server 2008 R2 are IPv6-only) and your hosts can take advantage of IPv6-enhanced connectivity.” Support for IPv6 in Windows Server 2008 R2 and Windows 7
Internet Protocol Version 4 (TCP/IPv4)
Essential
Microsoft LLDP Protocol Driver
Microsoft’s version of LLDP. Not the same as LLTD (below). Discovers stuff on your network (advanced users see here). I recommend most users leave this as is. Not needed if you aren’t accessing anything except the internet on your network.
Link-Layer Topology Discovery Mapper I/O Driver & Link-Layer Topology Discovery Responder
Basically this enables the pretty little Network Map in Vista and Windows 7. There is no Network Map in Windows 8 so I can only assume this was left in for legacy reasons.
From what I’ve observed these protocols are basically inactive until you or someone on your network tries to view the network map.
Adjusting Network Settings
Press the Windows + R keys and type ncpa.cpl
Or
Use the Search charm and type ncpa.cpl
Or
Control Panel > Network and Sharing Center > Change adapter settings
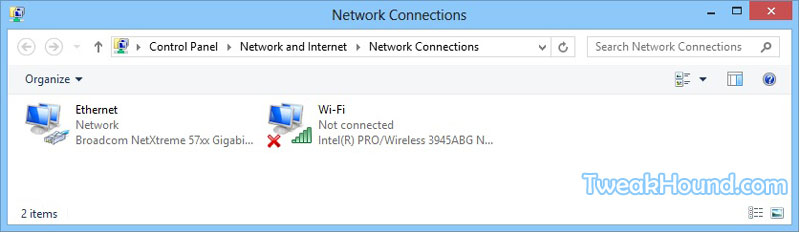
Then right-click on the adapter you wish to edit and choose Properties.
*Tip – Yes, you can configure each connection differently!
*Tip – While your here, if you aren’t going to use one of the connections, disable it (right-click > Disable). On my laptop I disable the Wireless connection while at home because I network it via Ethernet. When needed I just come back here and enable it.
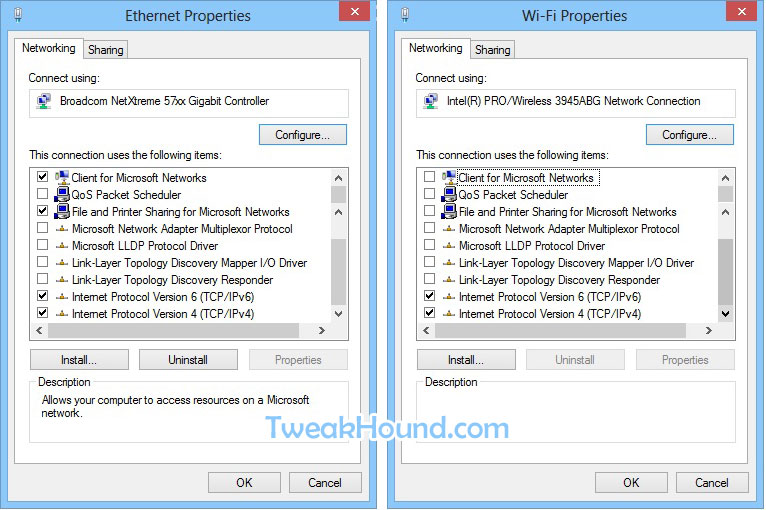
In the above example I basically disabled Windows networking on Wi-Fi while maintaining internet access.
NEXT >>>